ParaView/Users Guide/Python Calculator: Difference between revisions
No edit summary |
No edit summary |
||
| Line 49: | Line 49: | ||
<source lang="python"> | <source lang="python"> | ||
area(inputs[0]) | area(inputs[0]) | ||
</source> | |||
== Comparing Multiple Datasets == | |||
As described above, the Python Calculator can accept multiple inputs. Using this functionality, you can compare multiple datasets. There are a few things to note: | |||
* Python Calculator will always copy the mesh from the first input to its output, | |||
* All operations are applied point by point. In most cases, this requires that the input meshes (topology and geometry) are the same. At the least, it requires the the inputs have the same number of points or cells | |||
* In parallel execution mode, the inputs have to be distributed exactly the same way across processes | |||
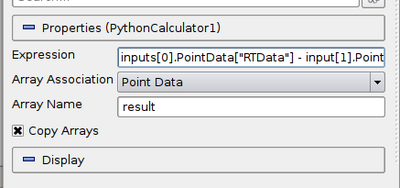
For example, to compare the temperature of 2 datasets, you can select both inputs, apply the Python Calculator and then use the following expression. | |||
<source lang="python"> | |||
inputs[0].PointData['temperature'] - inputs[1].PointData['temperature'] | |||
</source> | </source> | ||
Revision as of 20:41, 14 December 2010
Introduction
The Python Calculator is a ParaView filter that processes one or more input arrays based on an expression provided by the user to produce a new output array. The parameters of the filter include the expression, the association of the output array (Point or Cell Data), the name of output array and a toggle that controls whether the input arrays are copied to the output. In this document, we introduce the use of the Python Calculator and provide a list of functions available to the user.
Note that the Python Calculator depends on Python and NumPy. All ParaView binaries distributed by Kitware are built with these to enable the calculator. If you have built ParaView yourself, you have to make sure that NumPy is installed and that PARAVIEW_ENABLE_PYTHON is turned on when configuring the ParaView build.
Basic Tutorial
Start by creating a Sphere source and applying the Python Calculator to it. As the first expression, use the following and apply:
<source lang="python"> 5 </source>
This should create an array name "result" in the output point data. Note that this is an array that has a value of 5 for each point. When the expression results in a single value, the calculator will automatically make an constant array. Next, try the following:
<source lang="python"> Normals </source>
Now the "result" array should be the same as the input array Normals. As described in detail later, various functions are available through the calculator. For example, the following is a valid expression.
<source lang="python"> sin(Normals) + 5 </source>
It is very important to note that the Python Calculator has to produce one value per point or cell depending on the Array Association parameter. Most of the functions described here apply individually to all point or cell values and produce an array as the same dimensions as the input. However, some of them (such as min() and max()) produce single values.
Accessing Data
There are several ways of accessing input arrays within expressions. The simplest way is to access it by name:
<source lang="python"> sin(Normals) + 5 </source>
This is equivalent to:
<source lang="python"> sin(inputs[0].PointData['Normals']) + 5 </source>
The example above requires some explanation. Here inputs[0] refer to the first input (dataset) to the filter. Python Calculator can accept multiple inputs. Each input can be accessed as inputs[0], inputs[1], ... You can access the point or cell data of an input using the .PointData or .CellData qualifiers. You can then access individual arrays within the point or cell data containers using the [] operator. Make sure to use quotes or double-quotes around the array name. NOTE: Arrays that have names with certain characters (such as space, +, -, *, /) in their name can only be accessed using this method.
Certain functions apply directly on the input mesh. These filters expect an input dataset as argument. For example,
<source lang="python"> area(inputs[0]) </source>
Comparing Multiple Datasets
As described above, the Python Calculator can accept multiple inputs. Using this functionality, you can compare multiple datasets. There are a few things to note:
- Python Calculator will always copy the mesh from the first input to its output,
- All operations are applied point by point. In most cases, this requires that the input meshes (topology and geometry) are the same. At the least, it requires the the inputs have the same number of points or cells
- In parallel execution mode, the inputs have to be distributed exactly the same way across processes
For example, to compare the temperature of 2 datasets, you can select both inputs, apply the Python Calculator and then use the following expression.
<source lang="python"> inputs[0].PointData['temperature'] - inputs[1].PointData['temperature'] </source>
Basic Operations
- details about the expected output here - splitting arrays - merging arrays - constants - point to numpy documentation
Comparing Multiple Datasets
Functions
- point the numpy documentation
