CMake:Component Install With CPack: Difference between revisions
DougGregor (talk | contribs) m (Screenshot) |
DougGregor (talk | contribs) |
||
| Line 155: | Line 155: | ||
"headers". | "headers". | ||
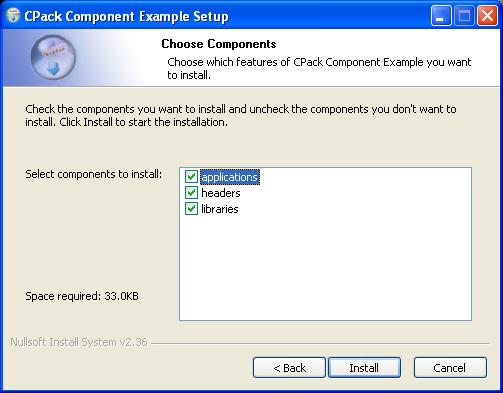
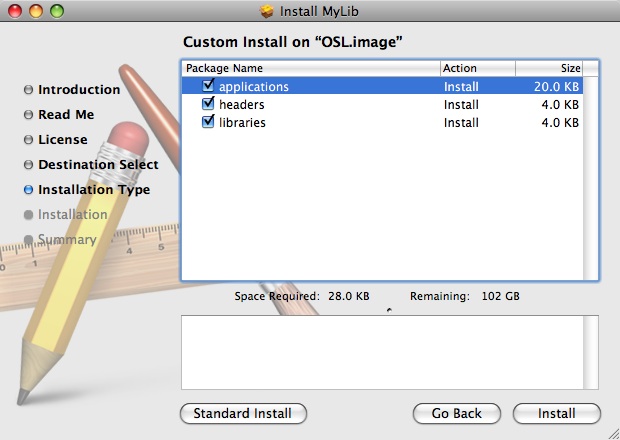
[[Image:CPackComponentNamesWindows.JPG]] | [[Image:CPackComponentNamesWindows.JPG]][[Image:CPackComponentNamesMac.jpg] | ||
There are several other properties associated with components, | There are several other properties associated with components, | ||
Revision as of 19:39, 17 June 2008
Component-Based Installers with CPack
CPack builds binary installers for a variety of platforms using CMake's existing installation infrastructure. Augmented by a set of CPack-specific macros, a program built with CMake can easily be distributed via a user-friendly installer.
By default, CPack's installers consider all of the files installed by a project as a single, monolithic unit: either the whole set of files is installed, or none of the files are installed. However, with many projects it makes sense for the installation to be subdivided into distinct, user-selectable components: some users may want to install only the comand-line tools for a project, while other users might want the GUI or the header files.
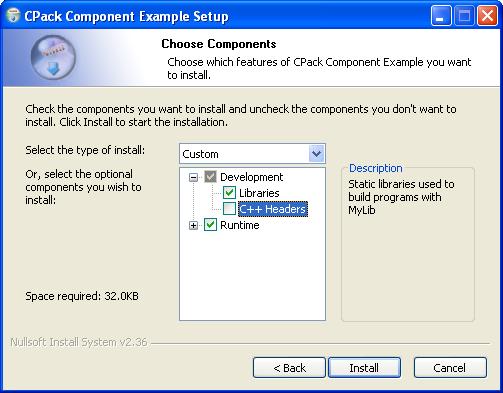
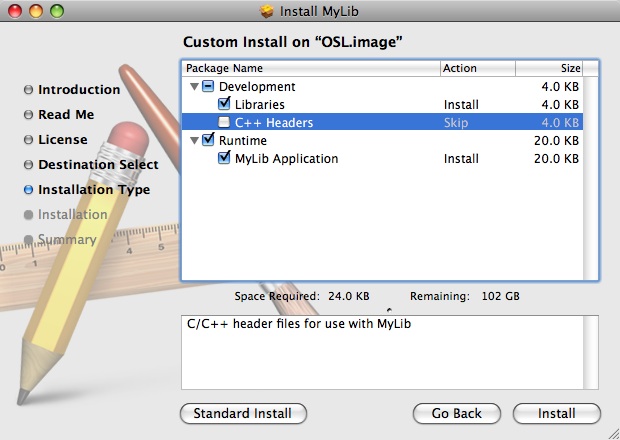
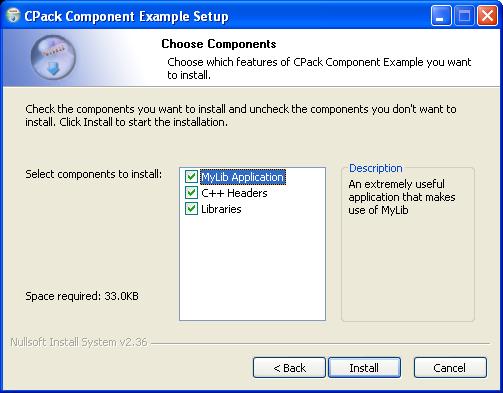
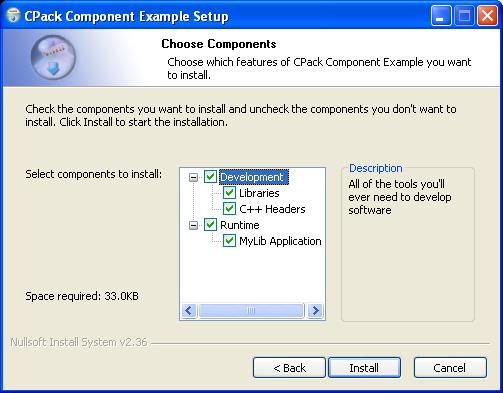
This document describes how to configure CPack to generate component-based installers that allow users to select the set of project components that they wish to install. In this document, we will develop a simple installer for a simple library that has three components: a library binary, a sample application, and a C++ header file. When we have finished, these resulting installers will looks like the customizable installers below, shown for Mac OS X and Windows:
Prerequisites
To begin, you should be able to build graphical installers using CPack either on Windows (using the NullSoft Installation System, NSIS) or Mac OS X (using PackageMaker). Also, as of the time of this writing, the extensions to CPack required to build component-based installers are not available in CMake. To build component-based installers, you will need to retrieve CMake from CVS and apply the patch for component-based installs, available in bug #blah. Be sure to use this version of CMake when configuring and building your project, otherwise the result will be a monolithic installer.
As our primary example, we will use a simple library called "MyLib" that builds a single library (`mylib`) and an application based on that library (`mylibapp`). The file File:ComponentExampleStart.zip contains the skeleton of such a library, with the following build and installation commands in `CMakeLists.txt`:
 cmake_minimum_required(VERSION 2.6.0 FATAL_ERROR)
 project(MyLib)
add_library(mylib mylib.cpp)
 add_executable(mylibapp mylibapp.cpp)
 target_link_libraries(mylibapp mylib)
 install(TARGETS mylib
   ARCHIVE
   DESTINATION lib)
 install(TARGETS mylibapp
   RUNTIME
   DESTINATION bin)
 install(FILES mylib.h
   DESTINATION include)
You should be able to configure, build, and (optionally) install this project using CMake with its library, application, and header file.
Building Binary Installers with CPack
To build binary installers with CPack, first add the following to the end of `CMakeLists.txt`:
 set(CPACK_PACKAGE_NAME "MyLib")
 set(CPACK_PACKAGE_VENDOR "CMake.org")
 set(CPACK_PACKAGE_DESCRIPTION_SUMMARY "MyLib - CPack Component Installation Example")
 set(CPACK_PACKAGE_VERSION "1.0.0")
 set(CPACK_PACKAGE_VERSION_MAJOR "1")
 set(CPACK_PACKAGE_VERSION_MINOR "0")
 set(CPACK_PACKAGE_VERSION_PATCH "0")
 set(CPACK_PACKAGE_INSTALL_DIRECTORY "CPack Component Example")
 # This must always be last!
 include(CPack)
More information about CPack and its configuration macros can be found [here], but this boilerplate suffices to enable the packaging target in a CMake build. From here, makefile users can invove `make package` to build a binary installer (e.g., on Mac OS X) and Visual Studio users can build the PACKAGE target.
Throughout this tutorial, we will be setting more `CPACK_` macros in `CMakeLists.txt` to communicate with CPack. It is very important that the SET commands for these macros come before the include of the `CPack` module!
Identifying Components
The first step in building a component-based installation is to identify the set of installable components. In our example library, we have decided on three components: the library binary, the application, and the header file. This decision is arbitrary and project-specific, but be sure to identify the components that correspond to units of functionality important to your user rather than basing the components on the internal structure of your program.
For each of these components, we need to identify which installed files are part of the component. For each INSTALL command in `CMakeLists.txt`, add an appropriate COMPONENT argument stating which component the installed files will be associated with:
 install(TARGETS mylib
   ARCHIVE
   DESTINATION lib
   COMPONENT libraries)
 install(TARGETS mylibapp
   RUNTIME
   DESTINATION bin
   COMPONENT applications)
 install(FILES mylib.h
   DESTINATION include
   COMPONENT headers)
Note that the COMPONENT argument to the INSTALL command is not new; it has been a part of CMake's INSTALL command to allow installation of only part of a project. If you are using any of the older installation commands (INSTALL_TARGETS, INSTALL_FILES , etc.), you will need to convert them to INSTALL commands to add the COMPONENT argument.
Finally, notify CPack of the names of all of the components in your project by setting the CPACK_COMPONENTS_ALL variables:
set(CPACK_COMPONENTS_ALL applications libraries headers)
At this point, you can build a component-based installer with CPack that will allow one to independently install the applications, libraries, and headers of MyLib.
Component Descriptions
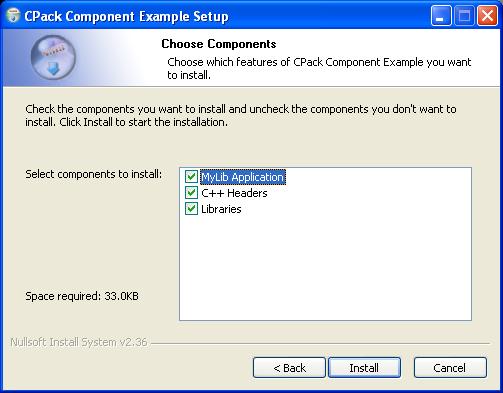
If you have built a binary installer at this point, you may have noted that the names of the actual components in the installer are not very descriptive: they just say "applications", "libraries", or "headers", as in the component names. We can improve on these names by setting several additional CPack variables:
 set(CPACK_COMPONENT_APPLICATIONS_DISPLAY_NAME "MyLib Application")
 set(CPACK_COMPONENT_LIBRARIES_DISPLAY_NAME "Libraries")
 set(CPACK_COMPONENT_HEADERS_DISPLAY_NAME "C++ Headers")
Any macro prefixed with CPACK_COMPONENT_${COMPNAME}, where ${COMPNAME} is the uppercase name of a component, is used to set a particular property of that component in the installer. Here, we set the DISPLAY_NAME property of each of our components, so that we get human-readable names. These names will be listed in the selection box rather than the internal component names "applications", "libraries", "headers".
There are several other properties associated with components, including the ability to make a component hidden, required, or disabled by default, to provide additional descriptive information, etc. We will encounter some of these other properties later; see the macro reference for a complete list.
Of particular note is the DESCRIPTION property, which provides some descriptive text for the component. This descriptive text will show up in a separate "description" box in the installer, and will be updated either when the user's mouse hovers over the name of the corresponding component (Windows) or when the user clicks on a component (Mac OS X). Here, we add a description for each of our components:
 set(CPACK_COMPONENT_APPLICATIONS_DESCRIPTION
   "An extremely useful application that makes use of MyLib")
 set(CPACK_COMPONENT_LIBRARIES_DESCRIPTION
   "Static libraries used to build programs with MyLib")
 set(CPACK_COMPONENT_HEADERS_DESCRIPTION
   "C/C++ header files for use with MyLib")
Generally, descriptions should provide enough information for the user to make a decision whether to include the component, but should not themselves be more than a few lines long (because the "Description" box in the installers tends to be small).
Intercomponent Dependencies
With most projects, the various components are not completely independent. For example, an application component may depend on the shared libraries in another component to execute properly, such that installing the application component without the corresponding shared libraries would result in an unusable installation. CPack allows you to express the dependencies between components, so that a component will only be installed if all of the other components it depends on are also installed.
To illustrate component dependencies, we will place a simple restriction on our component-based installer. Since we do not provide source code in our installer, the C++ header files we distribute can only actually be used if the user also installs the library binary to link her program against. Thus, the "headers" component depends on the availability of the "libraries" component. We can express this notion by setting the DEPENDS property for the HEADERS component as such:
set(CPACK_COMPONENT_HEADERS_DEPENDS libraries)
The DEPENDS property for a component is actually at list, and as such a component can depend on several other components. By expressing all of the component dependencies in this manner, you can ensure that users will not be able to select an incomplete set of components at installation time.
Grouping Components
When the number of components in your project grows large, you may need to provide additional organization for the list of components. To help with this organization, CPack includes the notion of component groups. A component group is, simply, a way to provide a name for a group of related components. Within the user interface, a component group has its own name, and underneath that group come all of the names of the components within the group. Users will have the option to (de-)select installation of all components in the group with a single click, or expand the group to select individual components.
We will expand our example by categorizing its three components, "applications", "libraries", and "headers", into "Runtime" and "Development" groups. We place a component into a group by setting the GROUP property of the component to the name of the group as follows:
 set(CPACK_COMPONENT_APPLICATIONS_GROUP "Runtime")
 set(CPACK_COMPONENT_LIBRARIES_GROUP "Development")
 set(CPACK_COMPONENT_HEADERS_GROUP "Development")
Like components, component groups have various properties that can be customized, including the DISPLAY_NAME and DESCRIPTION. To customization a component group, set the appropriate CPack macro with the prefix CPACK_COMPONENT_GROUP_${GROUPNAME}, where ${GROUPNAME} is the uppercase name of the group to modify. For example, the following code adds a description to the "Development" group:
 set(CPACK_COMPONENT_GROUP_DEVELOPMENT_DESCRIPTION
   "All of the tools you'll ever need to develop software")
Once you have customized the component groups to your liking, rebuild the binary installer to see the new organization: the MyLib application will show up under the new "Runtime" group, while the MyLib library and C++ header will show up under the new "Development" group. One can easily turn on/off all of the components within a group using the installer GUI. Some additional customizations of component groups are possible; please see the macro reference for a complete list.
Installation Types (NSIS Only)
When a project contains a large number of components, it is common for a Windows installer to provide pre-selected sets of components based on specific user needs. For example, a user wanting to develop software against a library will want one set of components, while an end user might use an entirely different set. CPack supports this notion of pre-selected component sets via installation types. An installation type is, simply, a set of components. When the user selects an installation type, exactly that set of components is selected---then the user is permitted to further customize the installation as desired.
For our simple example, we will create only two installation types: a "Full" installation type, which contains all of the components, and a "Developer" installation type, which includes only the libraries and headers. To do so, we first tell CPack which installation types we're using:
set(CPACK_ALL_INSTALL_TYPES Full Developer)
Like components and component groups, installation types have some properties (e.g., DISPLAY_NAME), which can be set via variables with prefix CPACK_INSTALL_TYPE_${INSTNAME}, where ${INSTNAME} is the uppercase name of the installation type. See the macro reference for additional information.
Next, we set the INSTALL_TYPES property of each component to state which installation types will include that component:
 set(CPACK_COMPONENT_LIBRARIES_INSTALL_TYPES Developer Full)
 set(CPACK_COMPONENT_HEADERS_INSTALL_TYPES Developer Full)
 set(CPACK_COMPONENT_APPLICATIONS_INSTALL_TYPES Full)
Components can be in any number of installation types. If you now rebuild the Windows installer, the components page will contain a combo box that allows you to select the installation type and therefore its corresponding set of components.
Next Steps
From here, you should be able to turn your existing CPack-generated binary installers into component-based installers to provide your users with more-flexible installation options. The complete example constructed by this tutorial is available as File:ComponentExample.zip. For a more advanced example of a component-based installer build with CPack, please visit the Boost-CMake project.
Macro Reference
In this reference, ${COMPNAME} refers to a component, ${GROUPNAME} refers to a component group, and ${INSTNAME} refers to an installation type, all of which are uppercase.
| Variable Name | Description |
|---|---|
| CPACK_COMPONENTS_ALL | A list containing the names of all components that should be installed. The presence of this macro indicates that CPack should build a component-based installer. Files associated with any components not listed here or any installation commands not associated with any component will not be installed. |
| CPACK_COMPONENT_${COMPNAME}_DISPLAY_NAME | The displayed name of the component ${COMPNAME}, used in graphical installers to display the component name. This value can be any string. |
| CPACK_COMPONENT_${COMPNAME}_DESCRIPTION | An extended description of the component ${COMPNAME}, used in graphical installers to give the user additional information about the component. Descriptions can span multiple lines using "\n" as the line separator. |
| CPACK_COMPONENT_${COMPNAME}_HIDDEN | Flag that indicates that this component will be hidden in the graphical installer, and therefore cannot be selected or installed. Only available with NSIS. |
| CPACK_COMPONENT_${COMPNAME}_REQUIRED | Flag that indicates that this component is required, and therefore will always be installed. It will be visible in the graphical installer, but it cannot be unselected. |
| CPACK_COMPONENT_${COMPNAME}_DISABLED | Flag that indicates that this component should be disabled (unselected) by default. The user is free to select this component for installation. |
| CPACK_COMPONENT_${COMPNAME}_DEPENDS | Lists the components on which this component depends. If this component is selected, then each of the components listed must also be selected. |
| CPACK_COMPONENT_${COMPNAME}_GROUP | Names the component group of which this component is a part. If not provided, the component will be a standalone component, not part of any component group. |
| CPACK_COMPONENT_${COMPNAME}_INSTALL_TYPES | Lists the installation types of which this component is a part. When one of these installations types is selected, this component will automatically be selected. Only available with NSIS. |
| CPACK_COMPONENT_GROUP_${GROUPNAME}_DISPLAY_NAME | The displayed name of the component group ${GROUPNAME}, used in graphical installers to display the component group name. This value can be any string. |
| CPACK_COMPONENT_GROUP_${GROUPNAME}_DESCRIPTION | An extended description of the component group ${GROUPNAME}, used in graphical installers to give the user additional information about the components contained within this group. Descriptions can span multiple lines using "\n" as the line separator. |
| CPACK_COMPONENT_GROUP_${GROUPNAME}_BOLD_TITLE | Flag indicating whether the group title should be in bold. Only available with NSIS. |
| CPACK_COMPONENT_GROUP_${GROUPNAME}_EXPANDED | Flag indicating whether the group should start out "expanded", showing its components. Otherwise only the group name itself will be shown until the user clicks on the group. Only available with NSIS. |
| CPACK_INSTALL_TYPE_${INSTNAME}_DISPLAY_NAME | The displayed name of the installation type. This value can be any string. |
Ideas for Future Development
- Add support for downloading components on-the-fly, such that installers will only contain the bare minimum setup data. In this case, CPack should also generate the archives for each of these components automatically, and (maybe) help users push those archives to the server. This is definitely possible with NSIS; it may be possible with PackageMaker as well.
- (Optionally) turn component-based Windows installer into a complete Add/Remove installer, by installing the installer and referencing it in Add/Remove Programs. This is most useful when combined with the above.
- Extend CMake to eliminate the need for CPACK_COMPONENTS_ALL, e.g., by providing a way to get the names of all components. One possible interface:
GET_CMAKE_PROPERTY(VARNAME COMPONENTS)
- CPack variables need to be set globally (in the top-level directory), but most of the INSTALL commands used for components occur within subdirectories. It is possible to use global properties to describe CPack variables, then export those as actual variables at the top level (this is what Boost-CMake does). Is there a better way to do this, perhaps by extending SET_PROPERTY to work on components? It would be somewhat more natural to say
   SET_PROPERTY(COMPONENT compname
     PROPERTY DISPLAY_NAME
     "Component name")
in user code, although this could certainly still be implemented in the CPack module as a mapping to
SET(CPACK_COMPONENT_${COMPNAME}_DISPLAY_NAME "Component name")
- Alternatively, instead of using only CPACK_* variables or properties to specify what components do, the CPack module could provide easy-to-use macros that set this information, e.g.,
   add_cpack_component(compname
                       [DISPLAY_NAME name]
                       [DESCRIPTION description]
                       [HIDDEN | REQUIRED | DISABLED ]
                       [GROUP group]
                       [DEPENDS comp1 comp2 ... ]
                       [INSTALL_TYPES type1 type2 ... ])

   add_cpack_component_group(groupname
                             [DISPLAY_NAME name]
                             [DESCRIPTION description]
                             [EXPANDED]
                             [BOLD_TITLE])
   add_cpack_installation_type(typename
                               [DISPLAY_NAME name])
- Add support for other binary installer generators, such as RPM and Deb. The installer will then create a set of RPM or Deb files, with appropriate dependencies. A key question here is granularity: RPMs and Debs tend to have a coarser granularity than graphical installers.
- Add support for component subgroups, e.g., component groups that are stored inside another component group.
- Graphviz output of components and their dependencies?
- Can component dependencies for target installations be determined automatically by CPack?
