ParaView/Displaying Data: Difference between revisions
(→Views) |
|||
| Line 34: | Line 34: | ||
that view. Simply click the button to create the view of your choice. | that view. Simply click the button to create the view of your choice. | ||
[[ | [[Image:ParaViewDisplayingDataFigure2.png|600px]] | ||
Some filters, such as '''Plot Over Line''' may automatically split the view | Some filters, such as '''Plot Over Line''' may automatically split the view | ||
| Line 53: | Line 53: | ||
When a new filter or source or reader is created, it will be displayed by | When a new filter or source or reader is created, it will be displayed by | ||
default in the active view, if possible (otherwise, if may create a new view). | default in the active view, if possible (otherwise, if may create a new view). | ||
==3D View== | ==3D View== | ||
Revision as of 13:52, 4 November 2010
The goal of visualization is to generate representations of the data in a visual form. In this chapter we will see different mechanisms available in ParaView to look at the data to gain insight into it.
Views
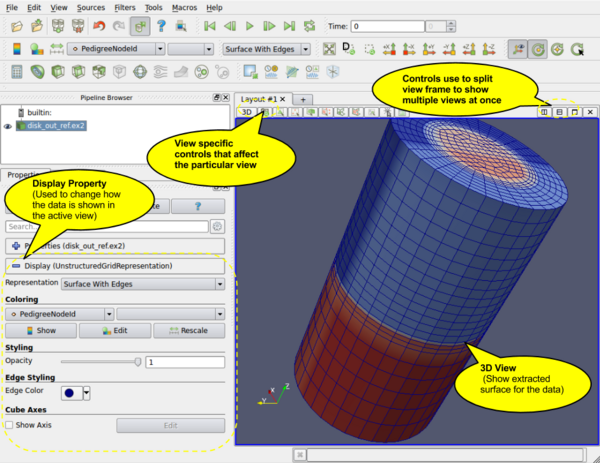
When the ParaView application starts up, one sees a 3D viewport with an axes at the center. This is a View. In ParaView, Views are frames in which the data can be seen. There are different types of views. The default view that shows up is a 3D View which shows rendering of the geometry extracted from the data or volumes or slices in a 3D scene. You can change the default view Settings dialog (Edit | Settings (in case of Mac OS X, ParaView | Preferences)).
There maybe parameters that are available to the user that control how the data is displayed e.g. in case of 3D View, the data can be displayed as wireframes or surfaces, you choose to change the color of the surface or use a scalar for coloring etc. All these options are known as Display properties and are accessible from the Display tab in the Object Inspector.
Since there can be multiple datasets shown in a view, as well as multiple views, the Display tabs shows the properties for the active pipeline object (changed by using the Pipeline browser, for example) in the active view.
Multiple Views
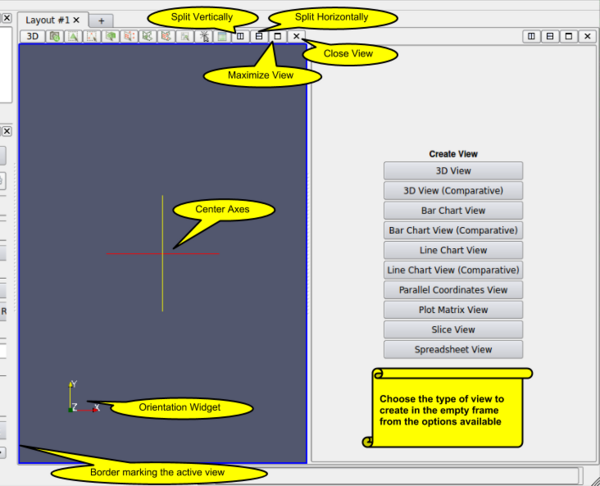
ParaView supports showing multiple views side by side. To create multiple views, simply use the controls on the top-right corner of the view to split the frame vertically or horizontally. You can even maximize a particular view to temporarily hide other views. Once a view-frame is split, you will see a list of buttons showing the different types of views that you can create to place in that view. Simply click the button to create the view of your choice.
Some filters, such as Plot Over Line may automatically split the view frame and show the data in a particular type of view suitable for the data generated by the filter.
Active View
Once you have multiple views, the active view if indicated by a colored border around the view frame. Several menus as well as toolbar buttons affect the active view alone. Also they may become enabled/disabled based on whether that corresponding action is supported by the active view.
The Display tab affects the active view. Similarly, the eye icon in the Pipeline Browser next the pipeline objects, indicates the visibility state for that object in the active view.
When a new filter or source or reader is created, it will be displayed by default in the active view, if possible (otherwise, if may create a new view).
3D View
3D View is used to show the surface or volume rendering for the data in a 3D world. This is the most commonly used view type.
When running in client-server mode, 3D View can render data either by bringing the geometry to the client and then rendering it there or by rendering it on the server (possibly in parallel) and then delivering the composited images to the client. Refer to the Client-Server Visualization chapter for details.
Interaction
Interacting with the 3D view will typically update the camera. This makes it possible to explore the visualziation scene. The default buttons are as follows, they can be changed using the Application Settings dialog.
| Rotate | Pan | Zoom | Roll | Rotate | Pan | Zoom | Rotate | Zoom |
This view supports selection. One can select cells or points either on the surface or those within a frustum. Selecting cells or points makes it possible to extract those for further inspection or label them etc.
View Settings
The view settings dialog accessible through the Edit | View Settings menu or the tool button on the left-corner of the view is used to change the view settings per view.
General
This tab allows the user to choose the background color. One can use a solid color or a gradient or even a background image.
By default the camera uses perspective projection. To switch to parallel projection, check the "Use Parallel Projection" checkbox in this panel.
Lights
The 3D View requires lights to illumniate the geometry being rendered in the scene. Once can control these lights using this pane.
Annotation
The annotation pane enables controlling the visibility of the center axes and the orientation widget.
Display Properties
View --------------------
| Control | Use |- View | Checkbox to toggle the visibility of the data in the active view. |- Selectable | Checkbox to toggle whether the data gets selected when using the selection mechanisms |- Zoom to Data | Zooms the camera to show the data in the active view
Color -----------------------
| Interpolate Scalars | If on, the scalars will be interpolated within polygons and the scalar mapping happens on per pixel basis. If off, then color mapping happens at points and colors are interpolated which is typically less accurate. This only affects when coloring with point arrays. Has no effect otherwise. | Map Scalars | If the data array being color with can be directly interpreted as colors then one can uncheck this to not use any lookup table. Otherwise, when on, a lookup table will be used to map scalars to colors. | Apply Texture | Makes is possible to apply a texture over the surface. This requires that the data has texture coordinates. Once can use filters like Texture Map to Sphere, Texture Map to Cylinder or Texture Map to Plane to generate texture coordinates when not present in the data. To load a texture, select Load from the combo-box which will popup a dialog allowing you to choose an image. Otherwise pick from already loaded textures listed in the combo-box. | Color By | This enables coloring of the surface/volume. Either choose the array to color with or set the solid color to use. When volume rendering, solid coloring is not possible, one has to choose the data array to volume render with.
Slice ---------
These setting are only available when showing a slice of an uniform grid dataset. Allows the user to pick the slice direction as well as the slice offset.
Annotation----------
Cube axes is a annotation box that can be used so show a scale around the dataset. Use the Show cube axes checkbox to toggle its visibility. You can further control the apperance of the cube axes by clicking Edit once the cube-axes is visible.
2D View
2D View is similar to 3D view except that it can only show slices from uniform grid datasets. The interaction is also limited to a 2D place i.e. rotation is not available.
Interaction
View Settings
Display Properties
Spreadsheet View
Spreadsheet View is used to inspect the raw data in a spreadsheet. When running in client-server mode, to avoid delivering the entire dataset to the client for displaying the spreadsheet (since the data can be very large), this view streams only visible chunks of the data to the client. As the user scrolls around the spreadsheet, new data chunks are fetched.
Unlike some other views, this view can only show one dataset at a time. For composite datasets, it shows only one block at a time. One can pick the block to show using the Display tab.
Interaction
- Choosing attributes to show
- Sorting
- Selection
- Show selected only
View Settings
Currently, no user settable settings are available for this view.

