ParaView/UsersGuide/Macros: Difference between revisions
DaveDemarle (talk | contribs) (Created page with "== Macros (aka Custom Filters) == It often happens that once you figure out how to do some specific data processing task, you will want to repeat that task often. It is very usef...") |
DaveDemarle (talk | contribs) m (improve text) |
||
| Line 1: | Line 1: | ||
== Macros (aka Custom Filters) == | == Macros (aka Custom Filters) == | ||
It often happens that once you figure out how to do some specific data processing task, you | It often happens that once you figure out how to do some specific data processing task, you want to repeat it often. | ||
You may for example want to reuse particular filters with specific settings (for example complicated calculator or programmable filter expressions) or even entire pipeline sections consisting on new data sets without having to manually enter the parameters each time. | |||
You can do this via the clever use of state files or more conveniently python scripts and python macros [[ParaView/Python_Scripting | 1 ]]. Saving, editing and reusing state files gives you the ability to recreate entire ParaView sessions. This does not give you fine enough control for small, repeatedly reused tasks. Python Tracing does give you fine grained control, but this assumes that your have python enabled in your copy of ParaView (which is usually but not always the case) and that you remember to turn on Trace recording before you did whatever it was that you want to play back. Both techniques largely require that you think like a programmer when you initially create and setup the scripts. | |||
Another alternative is to use ParaView's Custom Filters which let you create reusable meta-filters strictly within the GUI. | |||
A Custom Filter is a black box filter that encapsulates one or more filters in a sub-pipeline and exposes only those parameters from that sub-pipeline that the Custom Filter creator chose to make available. For example, if you capture a ten element pipeline in your Custom Filter where each filter happened to have eight parameters, you could choose to expose anywhere from zero to eighty parameters in your Custom Filter's '''Properties''' tab. | |||
A Custom Filter is a black box filter that encapsulates one or more filters in a sub-pipeline and exposes only those parameters from that sub-pipeline that the Custom Filter creator chose to make available. For example, if you | |||
| Line 14: | Line 14: | ||
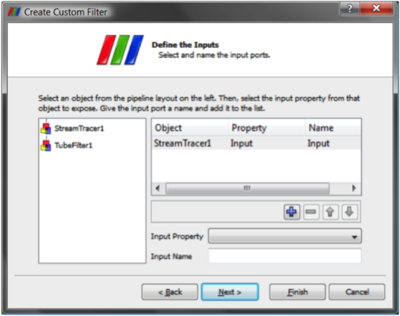
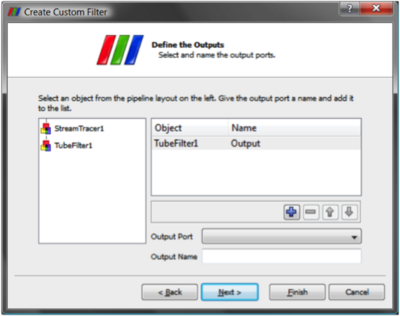
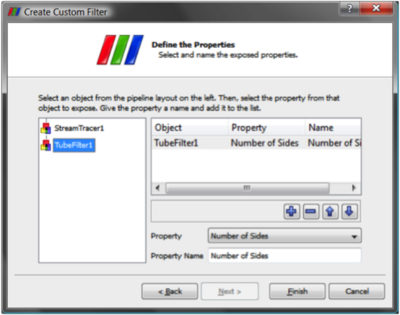
Once you have set up some pipeline that performs the data processing that you want to reuse, the process of creating a Custom Filter consists of three steps. First select one or more filters from the Pipeline Browser using the mouse. Next from the Tools menu select Create Custom Filter. From that dialog choose the | Once you have set up some pipeline that performs the data processing that you want to reuse, the process of creating a Custom Filter consists of three steps. First select one or more filters from the '''Pipeline Browser''' using the mouse. Next from the '''Tools''' menu select '''Create Custom Filter'''. From that dialog choose the filter in your chosen sub-pipeline who's input is representative of where you want data to enter into your Custom Filter. This is usually the topmost filter. If you are creating a multi-input filter, click the '''+''' button to add additional inputs and configure them in the same way. Clicking '''Next''' brings you to a similar dialog in which you choose the outputs of your Custom Filter. Click '''Next''' again to get to the last dialog. On this one you specify which parameters of the internal filters that you want to expose to the eventual user of the custom filter. You can optionally give each parameter a descriptive label here as well. The three dialogs are shown below. | ||
| Line 36: | Line 36: | ||
Once you create a Custom Filter it is added to the Alphabetical sub menu of the Filters menu. It is saved in ParaView's settings, so the next time you start ParaView on the same machine you | Once you create a Custom Filter it is added to the '''Alphabetical''' sub menu of the '''Filters''' menu. It is automatically saved in ParaView's settings, so the next time you start ParaView on the same machine you can use it just like any of the other filters that came with your copy of ParaView. Custom Filters are treated no differently than other filters in ParaView and are saveable and restorable in state files and python scripts. If you find that you no longer need some Custom Filter and want to get rid of it, use the '''Manage Custom Filters''' dialog box under the '''Tools''' menu to remove it. | ||
If on the other hand you find that a Custom Filter is very useful, you may instead want to give it to a colleague. On that same dialog are controls for exporting and importing Custom Filters. When you save a Custom Filter you are prompted for a location and filename to save the filter in | If on the other hand you find that a Custom Filter is very useful, you may instead want to give it to a colleague. On that same dialog are controls for exporting and importing Custom Filters. When you save a Custom Filter you are prompted for a location and filename to save the filter in. The file format is a simple XML text file that you can simply email or otherwise deliver. | ||
Revision as of 17:56, 28 January 2011
Macros (aka Custom Filters)
It often happens that once you figure out how to do some specific data processing task, you want to repeat it often. You may for example want to reuse particular filters with specific settings (for example complicated calculator or programmable filter expressions) or even entire pipeline sections consisting on new data sets without having to manually enter the parameters each time.
You can do this via the clever use of state files or more conveniently python scripts and python macros 1 . Saving, editing and reusing state files gives you the ability to recreate entire ParaView sessions. This does not give you fine enough control for small, repeatedly reused tasks. Python Tracing does give you fine grained control, but this assumes that your have python enabled in your copy of ParaView (which is usually but not always the case) and that you remember to turn on Trace recording before you did whatever it was that you want to play back. Both techniques largely require that you think like a programmer when you initially create and setup the scripts. Another alternative is to use ParaView's Custom Filters which let you create reusable meta-filters strictly within the GUI.
A Custom Filter is a black box filter that encapsulates one or more filters in a sub-pipeline and exposes only those parameters from that sub-pipeline that the Custom Filter creator chose to make available. For example, if you capture a ten element pipeline in your Custom Filter where each filter happened to have eight parameters, you could choose to expose anywhere from zero to eighty parameters in your Custom Filter's Properties tab.

Once you have set up some pipeline that performs the data processing that you want to reuse, the process of creating a Custom Filter consists of three steps. First select one or more filters from the Pipeline Browser using the mouse. Next from the Tools menu select Create Custom Filter. From that dialog choose the filter in your chosen sub-pipeline who's input is representative of where you want data to enter into your Custom Filter. This is usually the topmost filter. If you are creating a multi-input filter, click the + button to add additional inputs and configure them in the same way. Clicking Next brings you to a similar dialog in which you choose the outputs of your Custom Filter. Click Next again to get to the last dialog. On this one you specify which parameters of the internal filters that you want to expose to the eventual user of the custom filter. You can optionally give each parameter a descriptive label here as well. The three dialogs are shown below.
 | |
 | |
 |
Once you create a Custom Filter it is added to the Alphabetical sub menu of the Filters menu. It is automatically saved in ParaView's settings, so the next time you start ParaView on the same machine you can use it just like any of the other filters that came with your copy of ParaView. Custom Filters are treated no differently than other filters in ParaView and are saveable and restorable in state files and python scripts. If you find that you no longer need some Custom Filter and want to get rid of it, use the Manage Custom Filters dialog box under the Tools menu to remove it.
If on the other hand you find that a Custom Filter is very useful, you may instead want to give it to a colleague. On that same dialog are controls for exporting and importing Custom Filters. When you save a Custom Filter you are prompted for a location and filename to save the filter in. The file format is a simple XML text file that you can simply email or otherwise deliver.