ParaView/Users Guide/Query Data
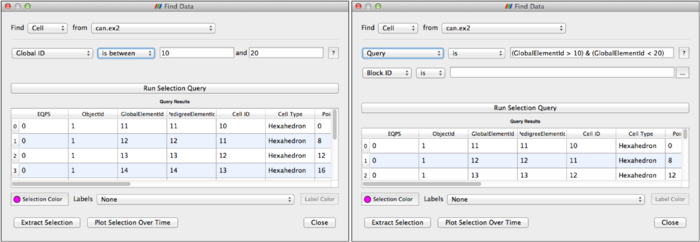
Find Data Dialog
As previously described, Selection is a mechanism in ParaView for sub-setting and focusing on a particular elements in the dataset. Different views provides different mechanisms for selecting elements, for example, you can select visible cells or points using the 3D View. Another mechanism for creating selections is by specifying a selection criteria. For example, suppose you want to select all cells where the pressure value is between a certain threshold. In such cases, you can use the Find Data dialog. The Find Data dialog performs a dual role: not only does it enable specifying the selection criteria but also show details of the selected elements in a spreadsheet. This makes it easier to inspect the selected elements.
To open the Find Data dialog, go to Edit|Find Data.
When to use Find Data
This feature is useful when you run into situations where you want to know the cell or the point at which a certain condition happens For example:
- What are the cells at which PRESSURE >= 12?
- What are the points with TEMP values in the range (12, 133)?
- Locate the cell at ID 122, in Block 2.
This feature provides a convenient way of creating selections based on certain criteria that can then be extracted from the data if needed.
Using the Find Data dialog
The dialog is designed to be used in two distinct operations:
- Define the selection criteria or query
- Process the selected cells/points e.g. show labels in active 3D view, extract selection etc.
You must define the selection query and then execute the query, using the Run Query button before being able to inspect or process the selected elements.
Defining the Query
First, decide what type of elements you are interested in selecting, that is cells or points and from what data source. This can be done using the following combo boxes. Note that as you change these, any previous selections/queries will be cleared.
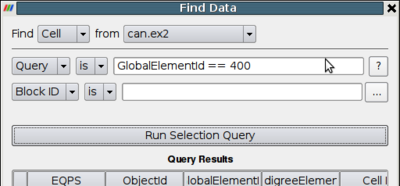
Next, you must define the query string. The syntax for specifying the query string is similar to the expressions used in the Python Calculator. In fact, ParaView indeed uses Python and numpy under the covers to parse the queries.
In addition, based on the data type and the nature of the current session, there may be additional rows that allow users to qualify the selection using optional parameters such as process number (when running in parallel), or block number (for composite datasets).
Once you have defined your query, hit Run Query button to execute the query. If any elements get selected, then they will be shown in the spreadsheet in this dialog. Also, if any of the views are showing in the dataset that is selected, then they will be highlighted the selected elements as well, just like regular view-based selection.
Sample Queries
- Select elements with a particular id
- <source lang="python">id == 100</source>
- Select elements given a list of ids
- <source lang="python"> contains(id, [100,101, 102]) </source>
- or
- <source lang="python"> in1d(id, [100,101, 102]) </source>
- Select elements with matching a criteria with element arrays Temp and V.
- <source lang="python"> Temp > 200 </source>
- or
- <source lang="python"> Temp == 200 </source>
- or
- <source lang="python"> contains(Temp, [200,300,400]) </source>
- or
- <source lang="python"> (Temp > 300) & (Temp < 400) # don't forget the parenthesis </source>
- or
- <source lang="python"> (Temp > 300) | (mag(V) > 0) </source>
- Select cells with cell volume matching certain criteria
- <source lang="python"> volume(cell) > 0 </source>
- or
- <source lang="python"> volume(cell) == max(volume(cell)) </source>
Rules for defining queries
- For the element type chosen, every element array becomes available as a field with same name as the array. Thus, if you are selecting points and the dataset has point arrays named "Temp" and "pressure", then you can construct queries using these arrays.
- Special fields id (corresponding to element id), cell (corresponding to the cell), dataset (corresponding to the dataset) are available and can be used to compute quantities to construct queries e.g. to compare volume of cells, use volume(cell).
- Queries can be combined using operators '&' and '|'.
Query generator
The combobox allow the user to create queries in a more intuitive but in a more limited way. Although, this could be useful specially when you want to learn how to write more complex query. To do so, you will need to execute your selection by using a field directly from the combobox instead of the "Query" key word. Any selection execution will internally generate a Query string which can be seen by switching back to the "Query" combobox value. Such query can then be used as part of a more complex one if needed.
Displaying the Selection
Once a query is executed, the selected elements will be highlighted in all views where the selected data is visible. If the active view is a 3D view, you can choose whether the show labels for selected elements as well as the color to use for showing the selected elements using the controls on the Find Data dialog itself.
Extracting the Selection
The results of a query are temporary. They get replaced when a new query is executed or when the user creates a selection using any of the selection mechanisms. Sometimes, however, users may want to further analyze the selected elements such as apply more filters to only the selected elements, or plot the change in attributes on the selected elements over time. In that case, you should extract the selection. That creates a new filter that is setup to run the query on its input and produce a dataset matching the selection criteria. Both Extract Selection and Plot Selection Over Time are filters available through the Filters menu. The Find Data dialog provides shortcut buttons to quickly create those filters and set then up with the selection criteria chosen.


