Advanced Animations: Difference between revisions
(New page: =Introduction= This tutorial deals with advanced topics in animations. ==The Animation View== *Open a data set. This example uses the training data disk_out_ref.exo, which can be downlo...) |
No edit summary |
||
| Line 4: | Line 4: | ||
==The Animation View== | ==The Animation View== | ||
*Open | *Open the data set can.exo, which can be downloaded at http://www.paraview.org/paraview/resources/software.html | ||
*On the Properties tab, select all variables and press the Apply button. | *On the Properties tab, select all variables and press the Apply button. | ||
*Drag the | *Drag the can around with the left mouse button. | ||
* | *Color by DISPL | ||
* | *View/ Animation View. | ||
[[Image:advanced_animations_new_1.png|800px]] | |||
* Grab the slider bar and move it back and forth. | |||
== | ==Temporal Interpolator== | ||
*In the Animation View window, change the mode to Sequence, and the No. Frames to 200. | |||
*In the Animation View window, | *Filters/ Temporal/ Temporal Interpolator. | ||
*Play. Notice that the can motion is now smooth. ParaView is interpolating between frames, and making 200 time steps. | |||
**Note that this only works with data that stays consistent through the whole time sequence. AMR (Adaptive Mesh Refinement) data does not work with the Temporal Interpolator. | |||
==Move the camera== | |||
*Double click on the time | *Delete the Temporal Interpolator. | ||
*Go to the First Frame. | |||
*In the Animation View, to the right of the blue plus sign is a pull down menu. Change to Camera. Next to that is a pull down menu that says Orbit. Change this to Interpolate Camera Location. Click on the blue plus sign. | |||
*Double click on the white horizontal bar that you just created. The Animation Keyframes dialog box should appear. | |||
*Position the can at whatever position you want to start at. | |||
*In the Animation Keyframes dialog box, double click on the word "Position..." for the first time step. Select "Use Current". OK. | |||
*Go to the Last Frame. | |||
*Position the can at whatever position you want to end at. Use the <SHFT> right mouse button to drag the can back to the middle of the screen. | |||
*In the Animation Keyframes dialog box, double click on the word "Position..." for the last time step. Select "Use Current". OK. | |||
*OK. | |||
*Now, hit the play button. Notice that the can stays in the middle of the screen. | |||
[[Image: | [[Image:advanced_animations_new_2.png|800px]] | ||
[[Image:advanced_animations_new_3.png|800px]] | |||
* | *You can also create an intermediate destination for the can by going to the Animation Keyframes dialog, and selecting New. Then, follow the directions above. | ||
*Experiment by adding more keyframes and different camera angles. | |||
==Orbit with the camera== | |||
*In the Animation View, delete the Camera. (You will use the red X.) | |||
*Add a camera, but change Interpolate camera locations to be Orbit in the pull down dialog box next to Camera. OK. | |||
*Play | |||
*Double click on the white horizontal bar next to "Camera". Double click on Path... If you click on Camera Position, you can see where the camera is, as well as the Camera focus and the Up Direction. Probably for advanced users that want to use beta level features. OK, OK. | |||
*Play. | |||
* | *Advanced option - Create a "Follow Path" camera. This is the same as a circle above, but is an open loop. | ||
==Data Animation== | ==Data Animation== | ||
In the previous example we showed how to manipulate the camera using the Animation View tools, in this example we will show how to animate your data set. | In the previous example we showed how to manipulate the camera using the Animation View tools, in this example we will show how to animate your data set. Our goal is to show one data set, then fade into another dataset. This can be handy when one physics simulation runs for an early time period, and another physics simulation runs for the later time period. | ||
*Lets start from scratch. One way is to go File/ Disconnect. Ok. | |||
*If you closed it, bring up the Animation View. | |||
*Open can.exo, all variables on, Apply. | |||
*Open can.exo again, all variables on, Apply. | |||
*Select the upper can.exo, and change to color by DISPL. Last time step, Rescale to Data Range, first time step. | |||
*Select the lower can.exo, and chage the representation to Wireframe. | |||
We now want to fade from the first version of the can to the second version of the can. This is done as follows: | |||
*On the Animation View, on the can.ex2 pulldown menu, select the upper can.ex2. Right of there, use the pulldown menu to select Opacity. Click the blue plus sign. | |||
*Do the same for the lower can.ex2. | |||
*Click on the upper can.ex2 white horizontal bar. Double click on the upper value, change it to 1. Double click the lower value, change it to 0. OK. | |||
*Play. | |||
You can substitute Visibility for Opacity when you add tracks to the Animation View. Then, on one dataset, you can run visibility of 1 for half of your time, and run visibility of 1 for the other dataset for the second half of your time. Thus, you will show the first simulation for the first half of your animation, and the second simulation for the second half. | |||
==Warp Vector== | |||
* If your dataset has displacement data, but it is not using a variable name that ParaView recognizes, you can still animate your data. Choose the Filters/ Alphabetical/ Warp Vector filter. | |||
=Acknowledgements= | =Acknowledgements= | ||
Sandia is a multiprogram laboratory operated by Sandia Corporation, a Lockheed Martin Company, for the United States Department of Energy’s National Nuclear Security Administration under contract DE-AC04-94AL85000. | Sandia is a multiprogram laboratory operated by Sandia Corporation, a Lockheed Martin Company, for the United States Department of Energy’s National Nuclear Security Administration under contract DE-AC04-94AL85000. | ||
Revision as of 01:49, 25 August 2009
Introduction
This tutorial deals with advanced topics in animations.
The Animation View
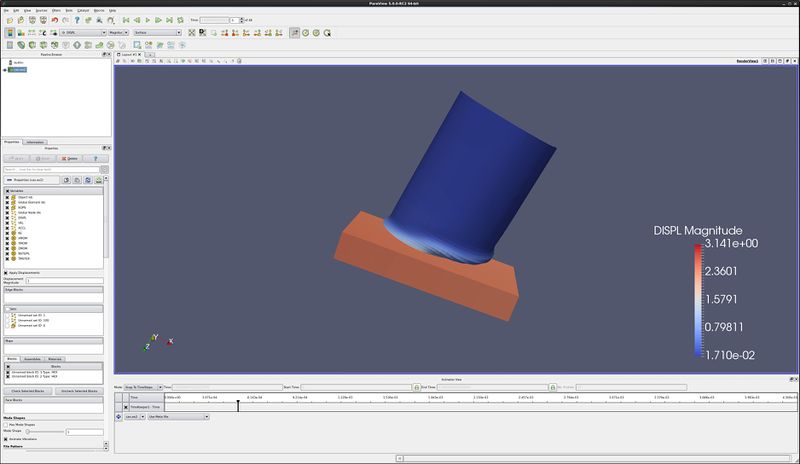
- Open the data set can.exo, which can be downloaded at http://www.paraview.org/paraview/resources/software.html
- On the Properties tab, select all variables and press the Apply button.
- Drag the can around with the left mouse button.
- Color by DISPL
- View/ Animation View.
- Grab the slider bar and move it back and forth.
Temporal Interpolator
- In the Animation View window, change the mode to Sequence, and the No. Frames to 200.
- Filters/ Temporal/ Temporal Interpolator.
- Play. Notice that the can motion is now smooth. ParaView is interpolating between frames, and making 200 time steps.
- Note that this only works with data that stays consistent through the whole time sequence. AMR (Adaptive Mesh Refinement) data does not work with the Temporal Interpolator.
Move the camera
- Delete the Temporal Interpolator.
- Go to the First Frame.
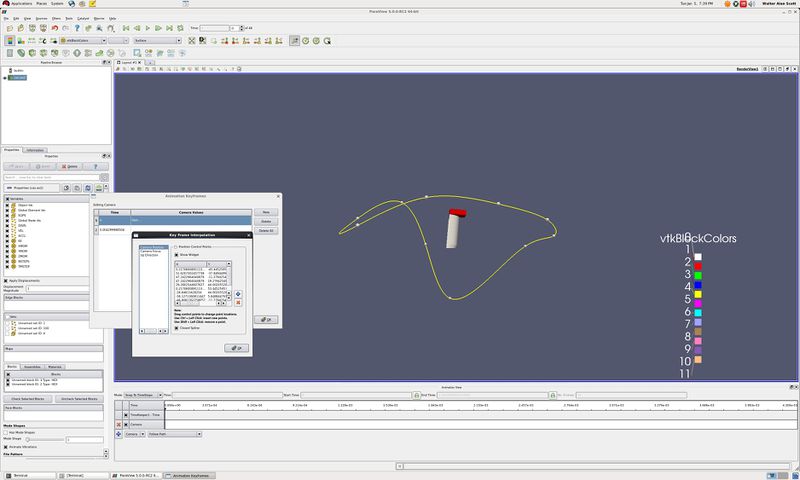
- In the Animation View, to the right of the blue plus sign is a pull down menu. Change to Camera. Next to that is a pull down menu that says Orbit. Change this to Interpolate Camera Location. Click on the blue plus sign.
- Double click on the white horizontal bar that you just created. The Animation Keyframes dialog box should appear.
- Position the can at whatever position you want to start at.
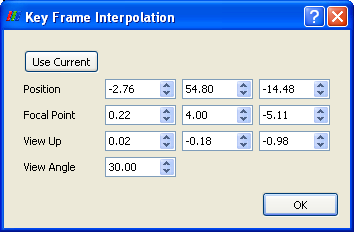
- In the Animation Keyframes dialog box, double click on the word "Position..." for the first time step. Select "Use Current". OK.
- Go to the Last Frame.
- Position the can at whatever position you want to end at. Use the <SHFT> right mouse button to drag the can back to the middle of the screen.
- In the Animation Keyframes dialog box, double click on the word "Position..." for the last time step. Select "Use Current". OK.
- OK.
- Now, hit the play button. Notice that the can stays in the middle of the screen.
- You can also create an intermediate destination for the can by going to the Animation Keyframes dialog, and selecting New. Then, follow the directions above.
- Experiment by adding more keyframes and different camera angles.
Orbit with the camera
- In the Animation View, delete the Camera. (You will use the red X.)
- Add a camera, but change Interpolate camera locations to be Orbit in the pull down dialog box next to Camera. OK.
- Play
- Double click on the white horizontal bar next to "Camera". Double click on Path... If you click on Camera Position, you can see where the camera is, as well as the Camera focus and the Up Direction. Probably for advanced users that want to use beta level features. OK, OK.
- Play.
- Advanced option - Create a "Follow Path" camera. This is the same as a circle above, but is an open loop.
Data Animation
In the previous example we showed how to manipulate the camera using the Animation View tools, in this example we will show how to animate your data set. Our goal is to show one data set, then fade into another dataset. This can be handy when one physics simulation runs for an early time period, and another physics simulation runs for the later time period.
- Lets start from scratch. One way is to go File/ Disconnect. Ok.
- If you closed it, bring up the Animation View.
- Open can.exo, all variables on, Apply.
- Open can.exo again, all variables on, Apply.
- Select the upper can.exo, and change to color by DISPL. Last time step, Rescale to Data Range, first time step.
- Select the lower can.exo, and chage the representation to Wireframe.
We now want to fade from the first version of the can to the second version of the can. This is done as follows:
- On the Animation View, on the can.ex2 pulldown menu, select the upper can.ex2. Right of there, use the pulldown menu to select Opacity. Click the blue plus sign.
- Do the same for the lower can.ex2.
- Click on the upper can.ex2 white horizontal bar. Double click on the upper value, change it to 1. Double click the lower value, change it to 0. OK.
- Play.
You can substitute Visibility for Opacity when you add tracks to the Animation View. Then, on one dataset, you can run visibility of 1 for half of your time, and run visibility of 1 for the other dataset for the second half of your time. Thus, you will show the first simulation for the first half of your animation, and the second simulation for the second half.
Warp Vector
- If your dataset has displacement data, but it is not using a variable name that ParaView recognizes, you can still animate your data. Choose the Filters/ Alphabetical/ Warp Vector filter.
Acknowledgements
Sandia is a multiprogram laboratory operated by Sandia Corporation, a Lockheed Martin Company, for the United States Department of Energy’s National Nuclear Security Administration under contract DE-AC04-94AL85000.


