Bender/Documentation/1.0/Modules/Workflow: Difference between revisions
(Review == 1) Adjust labelmap ==) |
m (Move right images to the top of each section) |
||
| Line 39: | Line 39: | ||
* '''Label(s)''': List all the label(s) that should be visible (i.e. opacity > 0.), all the other labels will be hidden (i.e. opacity = 0.). Labels must be separated with a ',' (comma). | * '''Label(s)''': List all the label(s) that should be visible (i.e. opacity > 0.), all the other labels will be hidden (i.e. opacity = 0.). Labels must be separated with a ',' (comma). | ||
* '''Go To Volume Rendering''': Opens the [http://wiki.slicer.org/slicerWiki/index.php/Documentation/4.1/Modules/VolumeRendering Volume Rendering] module. It gives full control over the volume rendering parameters such as the color and opacity transfer functions, shading, rendering quality... | * '''Go To Volume Rendering''': Opens the [http://wiki.slicer.org/slicerWiki/index.php/Documentation/4.1/Modules/VolumeRendering Volume Rendering] module. It gives full control over the volume rendering parameters such as the color and opacity transfer functions, shading, rendering quality... | ||
|[[Image:AdvancedPanel-1.0.png|thumb|550px|Advanced properties panel]] | |valign="top"|[[Image:AdvancedPanel-1.0.png|thumb|550px|Advanced properties panel]] | ||
|} | |} | ||
| Line 77: | Line 77: | ||
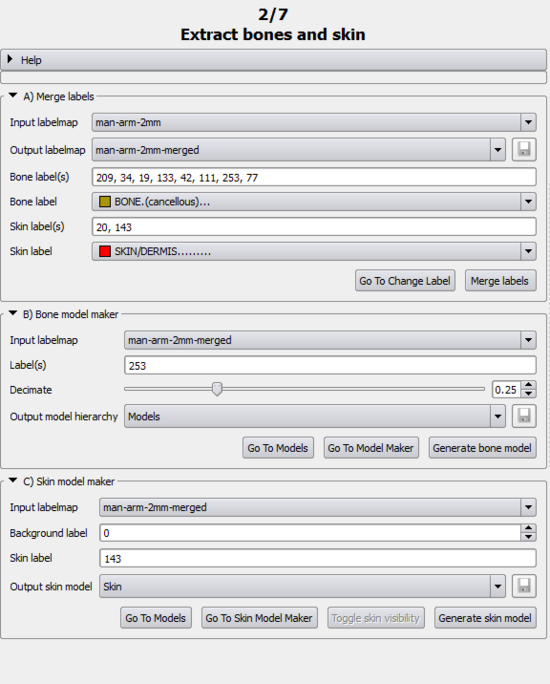
* '''Go To Change Label''': Open the [[Bender/Documentation/1.0/Modules/ChangeLabel|Change Label]] module to merge other labels together or simply change label values. | * '''Go To Change Label''': Open the [[Bender/Documentation/1.0/Modules/ChangeLabel|Change Label]] module to merge other labels together or simply change label values. | ||
|[[Image:AdjustPanel-1.0.png|thumb|550px|Adjust labelmap panel]] | |valign="top"|[[Image:AdjustPanel-1.0.png|thumb|550px|Adjust labelmap panel]] | ||
|} | |} | ||
| Line 112: | Line 112: | ||
* '''Go To Grayscale Model Maker''': Opens the [http://wiki.slicer.org/slicerWiki/index.php/Documentation/4.1/Modules/GrayscaleModelMaker Grayscale Model Maker] module. The module give more control computation parameters such as the smoothing, the computation of the normal, etc... | * '''Go To Grayscale Model Maker''': Opens the [http://wiki.slicer.org/slicerWiki/index.php/Documentation/4.1/Modules/GrayscaleModelMaker Grayscale Model Maker] module. The module give more control computation parameters such as the smoothing, the computation of the normal, etc... | ||
| | | valign="top"| | ||
[[Image:ExtractModelsPanel-1.0.png|thumb|550px|Extract bone and skin panel]] | [[Image:ExtractModelsPanel-1.0.png|thumb|550px|Extract bone and skin panel]] | ||
|} | |} | ||
| Line 131: | Line 131: | ||
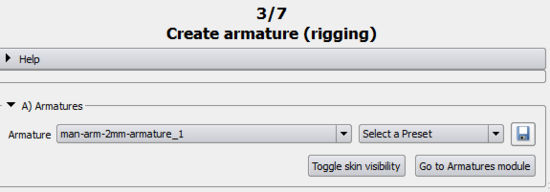
* '''Go To Armature Module''': Opens the [[Bender/Documentation/1.0/Modules/Armatures|Armatures]] module.[[Bender/Documentation/1.0/Modules/Armatures|Armatures]] module allows the user to modify the armature by adding, tweaking, deleting bones in Rest mode. The display properties of the armature like X-Ray mode, opacity, color or shape can also be modified there. | * '''Go To Armature Module''': Opens the [[Bender/Documentation/1.0/Modules/Armatures|Armatures]] module.[[Bender/Documentation/1.0/Modules/Armatures|Armatures]] module allows the user to modify the armature by adding, tweaking, deleting bones in Rest mode. The display properties of the armature like X-Ray mode, opacity, color or shape can also be modified there. | ||
| | | valign="top"| | ||
[[Image:RigArmaturePanel-1.0.png|thumb|550px|Rig armature panel]] | [[Image:RigArmaturePanel-1.0.png|thumb|550px|Rig armature panel]] | ||
|} | |} | ||
| Line 166: | Line 166: | ||
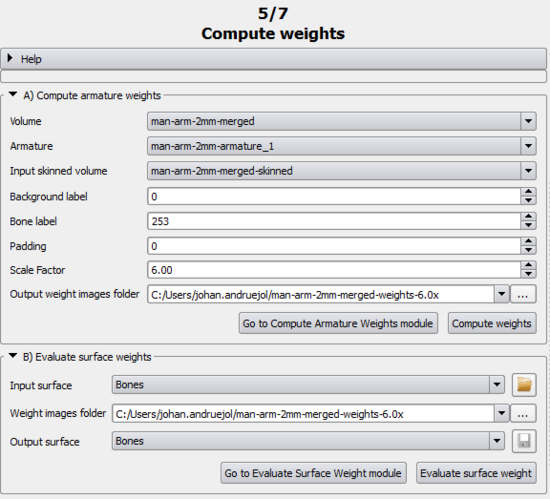
* '''Go To Compute Armature Weights Module''': Opens the [[Bender/Documentation/1.0/Modules/ComputeArmatureWeight|Compute Armature Weight]] module. In the [[Bender/Documentation/1.0/Modules/ComputeArmatureWeight|Compute Armature Weight]] module, the user can further refine the computation of the weight by, for example, restricting it to a given bone or the downsampling factor. | * '''Go To Compute Armature Weights Module''': Opens the [[Bender/Documentation/1.0/Modules/ComputeArmatureWeight|Compute Armature Weight]] module. In the [[Bender/Documentation/1.0/Modules/ComputeArmatureWeight|Compute Armature Weight]] module, the user can further refine the computation of the weight by, for example, restricting it to a given bone or the downsampling factor. | ||
| | | valign="top"| | ||
[[Image:SkinArmaturePanel-1.0.png|thumb|550px|Skin volume panel]] | [[Image:SkinArmaturePanel-1.0.png|thumb|550px|Skin volume panel]] | ||
|} | |} | ||
| Line 209: | Line 209: | ||
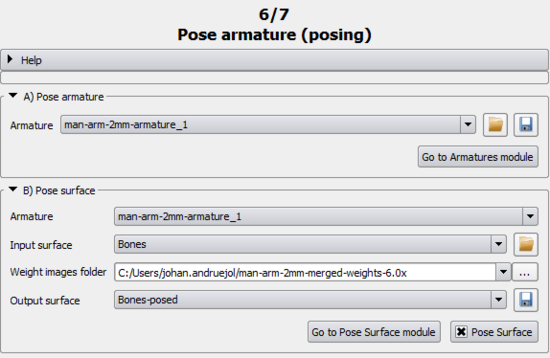
* '''Go To Pose Surface Module''': Opens the [[Bender/Documentation/1.0/Modules/PoseSurface|Pose Surface]] module. | * '''Go To Pose Surface Module''': Opens the [[Bender/Documentation/1.0/Modules/PoseSurface|Pose Surface]] module. | ||
| | | valign="top"| | ||
[[Image:PoseArmaturePanel-1.0.png|thumb|550px|Pose armature panel]] | [[Image:PoseArmaturePanel-1.0.png|thumb|550px|Pose armature panel]] | ||
|} | |} | ||
| Line 232: | Line 232: | ||
* '''Go To Pose Labelmap Module''': Opens the [[Bender/Documentation/1.0/Modules/PoseLabelmap|Pose Labelmap]] module. It can be useful to tweak some of the parameters like the Maximum radius to prevent the computation to take too much time. | * '''Go To Pose Labelmap Module''': Opens the [[Bender/Documentation/1.0/Modules/PoseLabelmap|Pose Labelmap]] module. It can be useful to tweak some of the parameters like the Maximum radius to prevent the computation to take too much time. | ||
| | | valign="top"| | ||
[[Image:PoseLabelmapPanel-1.0.png|thumb|550px|Pose labelmap panel]] | [[Image:PoseLabelmapPanel-1.0.png|thumb|550px|Pose labelmap panel]] | ||
|} | |} | ||
Revision as of 13:18, 1 April 2013
Introduction
The Workflow module guides the user step-by-step into transforming a volume using a rigging, skinning and posing technique.
Typically, the anatomical pose of a voxelized model is limited by the imaging device used to acquire the underlying data, e.g., MRI and CT scanners have narrow entries. Changing the pose of an already acquired voxelized anatomical model enables new processing of human anatomy in a wide variety of poses. The workflow module allows an operator to specify a rigging that represents the anatomical pose of an existing voxel model, manipulate that rigging into a different anatomical pose, and then generate a new voxelized model that represents the original model resampled into that new position.
This module applies the Skeletal animation technique initially conceived for surfaces to voxelized models.
Details
Author: Julien Finet, Kitware
Contributor #1: Johan Andruejol, Kitware
Acknowledgements: This work is supported by the Air Force Research Laboratories.
Contact: Julien Finet
Use Cases
Parameters
Advanced properties
The Advanced properties can be shown or hidden by clicking on the
expanding button.
Volume renderAt anytime, the Volume render helps to visualize, inspect a volume/labelmap.
|
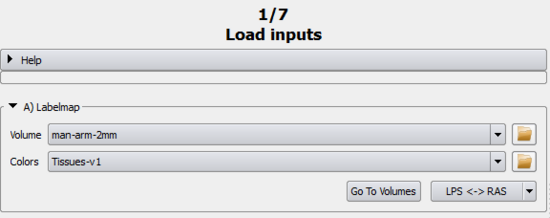
1) Adjust labelmap
The Adjust labelmap is the first step of the workflow. The user select here the volume to pose and can optionally prepare the volume before computation is applied.
A) LabelmapThis section makes sure the input labelmap has the right color table associated with it and is in the right coordinate system. Simple workflow
Advanced workflow
B) Merge labelsThis section provides the functionality of merging the bones labels and the skin labels of the input labelmap to ease the visualization/usability of the bones and the skin that often have different labels in the input 'raw' labelmap. Some labelmaps can have different labels for representing bones (e.g. bone marrow, bone cancellous, skull...). The Bender workflow handles only 1 label for the bones and 1 label for the skin. It is important to merge those similar labels into a unique label (1 for the bones, 1 for the skin). Simple workflow
Advanced workflow
|
2) Extract bone and skin
The 2) Extract bone and skin page deals with creating the bone and skin model that will serve as references and watch dogs for the posing.
A) Bone model makerThis helps to create the bone model. Simple workflow
Advanced workflow
B) Skin model makerThis section is in charge of creating the skin model. Simple workflow
Advanced workflow
|
3) Create armature (rigging)
Note: When opening this page, the view will automatically switch to 3D Only to help creating/visualizing the armature.
A) ArmaturesThe armature (either created or loaded) is the interface between the user and the transformations needed to pose the volume models. Once completed, the armature rest positions should not be changed since it would necessitate all the following computation to be updated as well. It is therefore highly encouraged to save the created armature in order to be able to restore it with Load armature from model. Simple workflow
|
4) Compute weights (skinning)
The Compute weights section is where each voxel of the input image gets attributed a weight that represents by how much it is influence by a given bone movement.
Note: When opening this page, the view will automatically switch to Four Up.
A) Volume skinningTo compute a weight, the skinning volume must first be computed. The skinning represents what bones influences the most a given voxel. Simple workflow
Advanced workflow
B) Compute armature weightThe weight computation is then refined further in order to consider the influence of every bone on a given voxel. Simple workflow
Advanced workflow
|
5) Pose armature (posing)
This page is meant to help the user to find the right pose before starting the 6) Pose labelmap by posing a model interactively.
Note: When opening this page, the current armature (if any) will automatically switch to Pose mode.
A) Evaluate surface weightThe first step is to evaluate the weight at each vertices of the model using A) Evaluate surface weight. Simple workflow
Advanced workflow
B) ArmaturesThis just serves as a quick link to the Armature module, should it be needed. Simple workflow
C) Pose surfaceThis poses any surface according to the armature. Usualy, the skin and bone models give a fairly good idea of what the result of the 6) Pose labelmap will look like. Simple workflow
Advanced workflow
|
6) Pose labelmap
Final step of the workflow, the 6) Pose labelmap uses the posed armature and the weights associated with it to compute the posed labelmap.
A) Resample labelmap with posePose a labelmap given an armature and the weights associated with it. Simple workflow
Advanced workflow
|
Similar Modules
- Used modules
- Bender modules: Armatures, Change Label, Compute Armature Weight, Pose Surface, Pose Labelmap, Volume Skinning
- Slicer modules: Grayscale Model Maker, Models, Models Maker, Volumes, Volume Rendering


