Bender/Documentation/2.0/Modules/SimpleWorkflow: Difference between revisions
| Line 23: | Line 23: | ||
*:Advanced properties are automatically set by the workflow logic for a "standard" processing. Nonetheless it is possible for the user to tweak those parameters. | *:Advanced properties are automatically set by the workflow logic for a "standard" processing. Nonetheless it is possible for the user to tweak those parameters. | ||
*:Note that all the parameters are not exposed even in "Advanced Workflow" mode. The full list of parameters is available in the specific module panels that can be opened by clicking the "Go to XYZ" buttons. | *:Note that all the parameters are not exposed even in "Advanced Workflow" mode. The full list of parameters is available in the specific module panels that can be opened by clicking the "Go to XYZ" buttons. | ||
===Volume | ===Volume render=== | ||
* '''Labelmap''': Select the volume/labelmap you want to volume render. The checkbox next to labelmap controls whether the rendering is visible or not. | * '''Labelmap''': Select the volume/labelmap you want to volume render. The checkbox next to labelmap controls whether the rendering is visible or not. | ||
* '''Label(s)''': List all the label(s) that should be visible (i.e. opacity > 0.), all the other labels will be hidden (i.e. opacity = 0.). Labels must be separated with a ',' (comma). | * '''Label(s)''': List all the label(s) that should be visible (i.e. opacity > 0.), all the other labels will be hidden (i.e. opacity = 0.). Labels must be separated with a ',' (comma). | ||
| Line 30: | Line 30: | ||
|} | |} | ||
== 1) Adjust | == 1) Adjust labelmap == | ||
{| width="100%" | {| width="100%" | ||
| valign="top"| | | valign="top"| | ||
| Line 60: | Line 60: | ||
|} | |} | ||
== 2) Extract | == 2) Extract bone and skin == | ||
{| width="100%" | {| width="100%" | ||
| valign="top"| | | valign="top"| | ||
===A) Bone | ===A) Bone model maker === | ||
'''Simple workflow''' | '''Simple workflow''' | ||
* '''Output model hierarchy''': Select the output model hierarchy under which the bone model will be stored. | * '''Output model hierarchy''': Select the output model hierarchy under which the bone model will be stored. | ||
| Line 112: | Line 112: | ||
When opening this page, the view will automatically switch to ''Four Up''. | When opening this page, the view will automatically switch to ''Four Up''. | ||
===A) Volume | ===A) Volume skinning=== | ||
'''Simple workflow''' | '''Simple workflow''' | ||
* '''Volume''': Select the volume/labelmap that will be used for the skinning. | * '''Volume''': Select the volume/labelmap that will be used for the skinning. | ||
| Line 121: | Line 121: | ||
* '''Go To Volume Skinning Module''': Opens the [http://public.kitware.com/Wiki/index.php?title=Bender/Documentation/1.0/Modules/VolumeSkinning Volume Skinning] module. | * '''Go To Volume Skinning Module''': Opens the [http://public.kitware.com/Wiki/index.php?title=Bender/Documentation/1.0/Modules/VolumeSkinning Volume Skinning] module. | ||
===B) Compute | ===B) Compute armature weight=== | ||
'''Simple workflow''' | '''Simple workflow''' | ||
* '''Output weight image folder''': Select the folder where the weight images will be saved. | * '''Output weight image folder''': Select the folder where the weight images will be saved. | ||
| Line 141: | Line 141: | ||
When opening this page, the current armature (if any) will automatically switch to ''Pose'' mode. | When opening this page, the current armature (if any) will automatically switch to ''Pose'' mode. | ||
===A) Evaluate | ===A) Evaluate surface weight=== | ||
'''Simple workflow''' | '''Simple workflow''' | ||
* '''Output surface''': Select the output surface with the weight evaluated for each of its points. | * '''Output surface''': Select the output surface with the weight evaluated for each of its points. | ||
| Line 154: | Line 154: | ||
* '''Go Armature Module''': Opens the [http://public.kitware.com/Wiki/index.php?title=Bender/Documentation/1.0/Modules/Armatures Armature] module. In that case, the [http://public.kitware.com/Wiki/index.php?title=Bender/Documentation/1.0/Modules/Armatures Armature] module can be used to reset the current pose to its originals rest value. This can be useful in order to create a clean pose. | * '''Go Armature Module''': Opens the [http://public.kitware.com/Wiki/index.php?title=Bender/Documentation/1.0/Modules/Armatures Armature] module. In that case, the [http://public.kitware.com/Wiki/index.php?title=Bender/Documentation/1.0/Modules/Armatures Armature] module can be used to reset the current pose to its originals rest value. This can be useful in order to create a clean pose. | ||
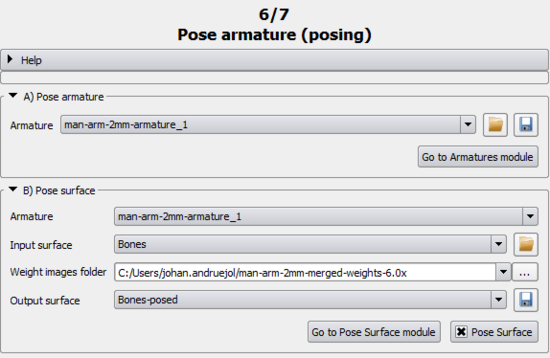
===C) Pose | ===C) Pose surface=== | ||
'''Simple workflow''' | '''Simple workflow''' | ||
* '''Output surface''': Select the output surface that will store the posed '''Input Surface'''. | * '''Output surface''': Select the output surface that will store the posed '''Input Surface'''. | ||
Revision as of 19:35, 25 March 2013
Introduction
This module guides the user step-by-step into transforming a volume using a rigging, skinning and posing technique.
Details
Author: Julien Finet, Kitware
Contributor #1: Johan Andruejol, Kitware
Acknowledgements: This work is supported by the Air Force Research Laboratories.
Contact: Julien Finet
Use Cases
Parameters
Advanced properties
Volume render
|
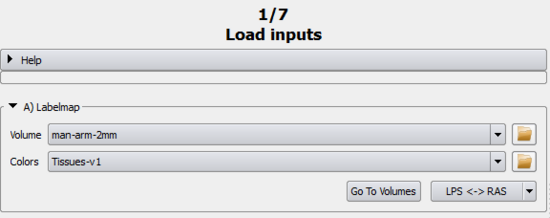
1) Adjust labelmap
A) LabelmapSimple workflow
Advanced workflow
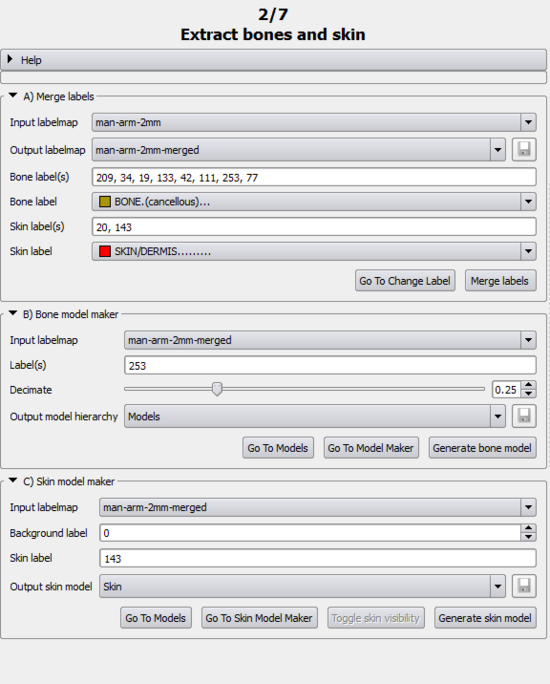
B) Merge labelsSimple workflow
Advanced workflow
|
2) Extract bone and skin
A) Bone model makerSimple workflow
Advanced workflow
B) Skin model makerSimple workflow
Advanced workflow
|
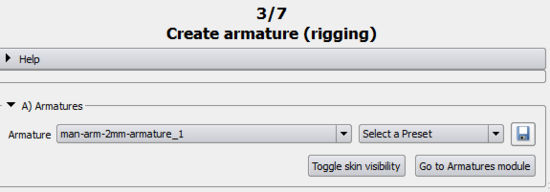
3) Create armature (rigging)
A) ArmaturesWhen opening this page, the view will automatically switch to 3D Only to help creating/visualizing the armature. The armature (either created or loaded) is the interface between the user and the transformations needed to pose the volume models. Once completed, the armature rest positions should not be changed since it would necessitate all the following computation to be updated as well. It is therefore highly encouraged to save the created armature in order to be able to restore it with Load armature from model. Simple workflow
|
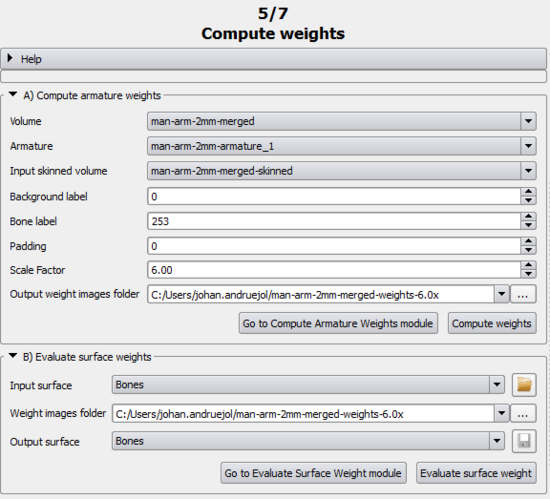
4) Compute weights (skinning)
|
When opening this page, the view will automatically switch to Four Up. A) Volume skinningSimple workflow
Advanced workflow
B) Compute armature weightSimple workflow
Advanced workflow
|
5) Pose armature (posing)
|
When opening this page, the current armature (if any) will automatically switch to Pose mode. A) Evaluate surface weightSimple workflow
Advanced workflow
B) ArmaturesSimple workflow
C) Pose surfaceSimple workflow
Advanced workflow
|
6) Pose labelmap
A) Resample labelmap with poseSimple workflow
Advanced workflow
|


