Bender/Documentation/2.0/Modules/FEMWorkflow
From KitwarePublic
< Bender | Documentation | 2.0/Modules
Jump to navigationJump to search
Introduction
This module guides the user step-by-step into transforming a volume using a rigging, skinning and posing technique.
Details
Author: Julien Finet, Kitware
Contributor #1: Johan Andruejol, Kitware
Acknowledgements: This work is supported by the Air Force Research Laboratories.
Contact: Julien Finet
Use Cases
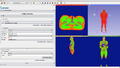
2mm labelmap volume loaded in workflow
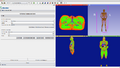
Bone and Skin surfaces extracted from 2mm labelmap volume
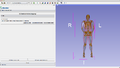
Rigging
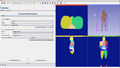
Volume Skinning


Parameters
Advanced properties
Volume Render |

1) Adjust Labelmap
A) LabelmapSimple workflow
Advanced workflow
B) Merge labelsSimple workflow Advanced workflow |


