Bender/Documentation/2.0/Modules/SimpleWorkflow: Difference between revisions
From KitwarePublic
< Bender | Documentation | 2.0/Modules
Jump to navigationJump to search
| Line 31: | Line 31: | ||
===A) Labelmap=== | ===A) Labelmap=== | ||
'''Simple workflow''' | '''Simple workflow''' | ||
* '''Volume''': Select the volume/labelmap that you want to reposition. | * '''Volume''': Select the volume/labelmap that you want to reposition. Read [http://wiki.slicer.org/slicerWiki/index.php/Documentation/4.1/SlicerApplication/LoadingData here] the instructions to load data into Bender. | ||
* '''Colors''': Select the color transfer function to apply to the volume . It will The transfer function is used to | * '''Colors''': Select the color transfer function to apply to the volume . It will The transfer function is used to | ||
* ''Apply'': Set the color transfer function to the volume. | * ''Apply'': Set the color transfer function to the volume. | ||
| Line 37: | Line 37: | ||
'''Advanced workflow''' | '''Advanced workflow''' | ||
* '''Go To Volumes''': Go to the [http://www.slicer.org/slicerWiki/index.php?title=Documentation/4.1/Modules/Volumes Volumes] module to read volume information (such as its size, origin, spacing, scalar type, range...) and display properties (window/level, threshold, interpolation...) | * '''Go To Volumes''': Go to the [http://www.slicer.org/slicerWiki/index.php?title=Documentation/4.1/Modules/Volumes Volumes] module to read volume information (such as its size, origin, spacing, scalar type, range...) and display properties (window/level, threshold, interpolation...) | ||
===B) Merge labels=== | ===B) Merge labels=== | ||
'''Simple workflow''' | '''Simple workflow''' | ||
Revision as of 14:33, 8 March 2013
Introduction
This module guides the user step-by-step into transforming a volume using a rigging, skinning and posing technique.
Details
Author: Julien Finet, Kitware
Contributor #1: Johan Andruejol, Kitware
Acknowledgements: This work is supported by the Air Force Research Laboratories.
Contact: Julien Finet
Use Cases
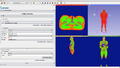
2mm labelmap volume loaded in workflow
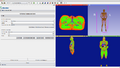
Bone and Skin surfaces extracted from 2mm labelmap volume
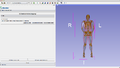
Rigging
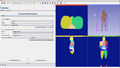
Volume Skinning


Parameters
Advanced properties
Volume Render |

1) Adjust Labelmap
A) LabelmapSimple workflow
Advanced workflow
B) Merge labelsSimple workflow Advanced workflow |


