Chapter 2
Configuring and Building ITK
This chapter describes the process for configuring and compiling ITK on your system. Keep
in mind that ITK is a toolkit, and as such, once it is installed on your computer it does not
provide an application to run. What ITK does provide is a large set of libraries which can be used
to create your own applications. Besides the toolkit proper, ITK also includes an extensive
set of examples and tests that introduce ITK concepts and show how to use ITK in your own
projects.
Some of the examples distributed with ITK depend on third party libraries, some of which may need to be
installed separately. For the initial build of ITK, you may want to ignore these extra libraries and just
compile the toolkit itself.
ITK has been developed and tested across different combinations of operating systems, compilers, and
hardware platforms including Microsoft Windows, Linux on various architectures, UNIX, macOS, and
Mingw-w64. Dedicated community members and Kitware are committed to providing long-term support of
the most prevalent development environments (Visual Studio, macOS, and Linux) for building
ITK:
Compiler variants will be supported for the duration that the associated operating system vendors commit to
in their long-term stable platforms. For example the gcc compilers supported will mirror the compiler
support in the RedHat lifecycle, the apple clang compilers will mirror the support lifecycle of the compiler
by Apple, and the Visual Studio series support will follow lifecycle deprecation of the compiler
versions.
For example as of 2018 the following time schedule is expected for supporting these compiler
environments.
- GCC
- 4.8.2 (From 2015-until 2020)
- Visual Studio
- 2010 [v10.0] (From 2010 - until 2020)
- 2012 [v11.0] (From 2012 - until 2022)
- 2013 [v12.0] (From 2013 - until 2023)
- Apple Clang
- Apple clang-600.0.56 (From 2013 - until 2019)
- Apple LLVM version 8.1.0 (clang-802.0.42) (From 2016 - until 2021)
- Clang
- 3.3 (From 2013 - until 2018)
Table 2.1 prints the compiler support timeline in ITK at the time of writing this guide.
| Compiler | 2011 | 2012 | 2013 | 2014 | 2015 | 2016 | 2017 | 2018 | 2019 | 2020 | 2021 | 2022 | 2023 | 2024 | 2025 | 2026 |
| Visual Studio 10 | | | | | | | | | | | | | | | | |
| GCC 4.2 | | | | | | | | | | | | | | | | |
| GCC 4.4 | | | | | | | | | | | | | | | | |
| GCC 4.9 | | | | | | | | | | | | | | | | |
| |
Table 2.1: ITK Compiler Support Timeline.
Legend:
| Fully supported |
| Phase out |
| If community supported |
| |
If you are currently using an outdated compiler this may be an excellent excuse for upgrading this old piece
of software! Support for different platforms is evident on the ITK quality dashboard (see Section ?? on page
??).
2.1 Obtaining the Software
There are two different ways to access the ITK source code:
-
Periodic releases
- Official releases are available on the ITK web
site .
They are released twice a year, and announced on the ITK web pages and discussion.
However, they may not provide the latest and greatest features of the toolkit.
-
Continuous repository checkout
- Direct access to the Git source code
repository
provides immediate availability to the latest toolkit additions. But, on any given day the
source code may not be stable as compared to the official releases.
This software guide assumes that you are using the current released version of ITK, available on
the ITK web site. If you are a new user, we recommend the released version of the software.
It is more consistent than the code available from the Git repository (see Section 2.1.2).
When working from the repository, please be aware of the ITK quality testing dashboard.
The Insight Toolkit is heavily tested using the open-source CDash regression testing
system .
Before updating the repository, make sure that the dashboard is green, indicating stable code.
(Learn more about the ITK dashboard and quality assurance process in Section ?? on page
??.)
2.1.1 Downloading Packaged Releases
ITK can be downloaded without cost from the following web site:
On the web page, choose the tarball that better fits your system. The options are .zip and .tar.gz files.
The first type is better suited for Microsoft-Windows, while the second one is the preferred format for
UNIX systems.
Once you unzip or untar the file a directory called InsightToolkit-5.0.0 will be created in your disk
and you will be ready to start the configuration process described in Section 2.2.1 on page
27.
2.1.2 Downloading From Git
Git is a free and open source distributed version control system. For more information about Git please see
Section ?? on page ??. (Note: please make sure that you access the software via Git only when the ITK
quality dashboard indicates that the code is stable.)
Access ITK via Git using the following commands (under a Git Bash shell):
git clone git://itk.org/ITK.git
This will trigger the download of the software into a directory named ITK. Any time you want to update
your version, it will be enough to change into this directory, ITK, and type:
Once you obtain the software you are ready to configure and compile it (see Section 2.2.1 on page 27).
First, however, we recommend reading the following sections that describe the organization of the software
and joining the discussion.
2.1.3 Data
The Insight Toolkit was designed to support the Visible Human Project and its associated data. This data is available
from the National Library of Medicine at http://www.nlm.nih.gov/research/visible/visible_human.html.
Another source of data can be obtained from the ITK Web site at either of the following:
2.2 Using CMake for Configuring and Building ITK
The challenge of supporting ITK across platforms has been solved through the use of
CMake , a
cross-platform, open-source build system. CMake controls the software compilation process with
simple platform and compiler-independent configuration files. CMake is quite sophisticated—it
supports complex environments requiring system introspection, compiler feature testing, and code
generation.
CMake generates native Makefiles or workspaces to be used with the corresponding development
environment of your choice. For example, on UNIX and MinGW systems, CMake generates Makefiles;
under Microsoft Windows CMake generates Visual Studio workspaces; CMake is also capable of
generating appropriate build files for other development environments, e.g., Eclipse. The information used
by CMake is provided in CMakeLists.txt files that are present in every directory of the ITK source tree.
Along with the specification of project structure and code dependencies these files specify the information
that need to be provided to CMake by the user during project configuration stage. Typical configuration
options specified by the user include paths to utilities installed on your system and selection of software
features to be included.
An ITK build requires only CMake and a C++ compiler. ITK ships with all the third party library
dependencies required, and these dependencies are used during compilation unless the use of a system
version is requested during CMake configuration.
2.2.1 Preparing CMake
CMake can be downloaded at no cost from
You can download binary versions for most of the popular platforms including Microsoft Windows, macOS,
Linux, PowerPC and IRIX. Alternatively you can download the source code and build CMake on your
system. Follow the instructions provided on the CMake web page for downloading and installing the
software. The minimum version of CMake has been evolving along with the version of ITK.
For example, the current version of ITK (5.0.0) requires the minimum CMake version to be
3.9.5.
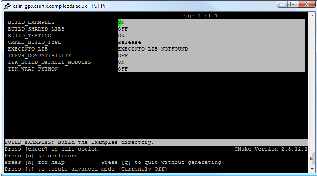
CMake provides a terminal-based interface (Figure 2.1) on platforms support the curses library. For most
platforms CMake also provides a GUI based on the Qt library. Figure 2.1 shows the terminal-based CMake
interface for Linux and CMake GUI for Microsoft Windows.
Running CMake to configure and prepare for compilation a new project initially requires two pieces of
information: where the source code directory is located, and where the compiled code is to be produced.
These are referred to as the source directory and the binary directory respectively. We recommend setting
the binary directory to be different than the source directory in order to produce an out-of-source
build.
If you choose to use the terminal-based version of CMake (ccmake) the binary directory needs to be created
first and then CMake is invoked from the binary directory with the path to the source directory. For
example:
mkdir ITK-build cd ITK-build ccmake ../ITK
In the GUI version of CMake (cmake-gui) the source and binary directories are specified in the appropriate
input fields (Figure 2.1) and the application will request a confirmation to create a new binary directory if it
does not exist.
CMake runs in an interactive mode which allows iterative selection of options followed by configuration
according to the updated options. This iterative process proceeds until no more options remain
to be specified. At this point, a generation step produces the appropriate build files for your
configuration.
This interactive configuration process can be better understood by imagining the traversal of a path in a
decision tree. Every selected option introduces the possibility that new, dependent options may
become relevant. These new options are presented by CMake at the top of the options list in its
interface. Only when no new options appear after a configuration iteration can you be sure that the
necessary decisions have all been made. At this point build files are generated for the current
configuration.
2.2.2 Configuring ITK
Start terminal-based CMake interface ccmake on Linux and UNIX, or the graphical user interface
cmake-gui on Microsoft Windows. Remember to run ccmake from the binary directory on Linux and
UNIX. On Windows, specify the source and binary directories in the GUI, then set and modify the
configuration and build option in the interface as necessary.
The examples distributed with the toolkit provide a helpful resource for learning how to use ITK
components but are not essential for compiling the toolkit itself. The testing section of the source
tree includes a large number of small programs that exercise the capabilities of ITK classes.
Enabling the compilation of the examples and unit tests will considerably increase the build
time. In order to speed up the build process, you can disable the compilation of the unit tests
and examples. This is done by setting the variables BUILD_TESTING and BUILD_EXAMPLES to
OFF.
Most CMake variables in ITK have sensible default values. Each time a CMake variable is changed, it is
necessary to re-run the configuration step. In the terminal-based version of the interface the configuration
step is triggered by hitting the “c” key. In the GUI version this is done by clicking on the “Configure”
button.
When no new options appear highlighted in CMake, you can proceed to generate Makefiles, a Visual Studio
workspace, or other appropriate build files depending on your preferred development environment. This is
done in the GUI interface by clicking on the “Generate” button. In the terminal-based version
this is done by hitting the “g” key. After the generation process the terminal-based version of
CMake will quit silently. The GUI window of CMake can be left open for further refinement of
configuration options as described in the next section. With this scenario it is important to generate new
build files to reflect the latest configuration changes. In addition, the new build files need to be
reloaded if the project is open in the integrated development environment such as Visual Studio or
Eclipse.
2.2.3 Advanced Module Configuration
Following the default configuration introduced in 2.2.2, the majority of the toolkit will be built. The modern
modular structure of the toolkit makes it possible to customize the ITK library by choosing which modules
to include in the build. ITK was officially modularized in version 4.0.0 released in December of 2011.
Developers have been testing and improving the modular structure since then. The toolkit currently contains
more than 100 regular/internal modules and many remote modules, while new ITK modules are being
developed.
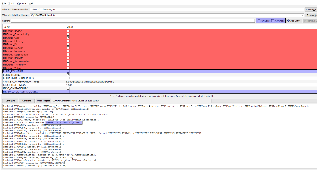
ITK_BUILD_DEFAULT_MODULES is the CMake option to build all default modules in the toolkit, by default
this option is ON as shown in Figure 2.1. The default modules include most internal ITK modules except the
ones that depend on external third party libraries (such as ITKVtkGlue, ITKVideoBridgeOpenCV,
ITKVideoBridgeVXL, etc.) and several modules containing legacy code (ITKReview, ITKDeprecated and
ITKV3Compatibility).
Apart from the default mode of selecting the modules for building the ITK library there are two
other approaches module selection: the group mode, and the advanced module mode. When
ITK_BUILD_DEFAULT_MODULES is set to OFF, the selection of modules to be included in the
ITK library can be customized by changing the variables enabling group and advanced module
selection.
ITKGroup_{group name} variables for group module selection are visible when ITK_BUILD_DEFAULT_MODULES
is OFF. The ITK source code tree is organized in such way that a group of modules characterised by
close relationships or similar functionalities stay in one subdirectory. Currently there are 11
groups (excluding the External and Remote groups). The CMake ITKGroup_{group name}
options are created for the convenient enabling or disabling of multiple modules at once. The
ITKGroup_Core group is selected by default as shown in Figure 2.2. When a group is selected, all
modules in the group and their depending modules are enabled. When a group variable is set to
OFF, all modules in the group, except the ones that are required by other enabled modules, are
disabled.
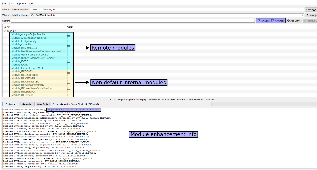
If you are not sure about which groups to turn on, but you do have a list of specific modules to be included
in your ITK library, you can certainly skip the Group options and use the Module_{module name} options
only. Whatever modules you select, their dependent modules are automatically enabled. In the advanced
mode of the CMake GUI, you can manually toggle the build of the non-default modules via the
Module_{module name} variables. In Figure 2.3 all default modules’ Module_{module name} variables
are shown disabled for toggling since they are enabled via the ITK_BUILD_DEFAULT_MODULES set to ON
variable.
However, not all modules will be visible in the CMake GUI at all times due to the various levels
of controls in the previous two modes. If some modules are already enabled by other modes,
these modules are set as internal variables and are hidden in the CMake GUI. For example,
Module_ITKFoo variable is hidden when the module ITKFoo is enabled in either of the following
scenarios:
- module ITKBar is enabled and depends on ITKFoo,
- ITKFoo belongs to the group ITKGroup_FooAndBar and the group is enabled
- ITK_BUILD_DEFAULT_MODULES is ON and ITKFoo is a default module.
To find out why a particular module is enabled, check the CMake configuration messages where the
information about enabling or disabling the modules is displayed (Figure 2.3); these messages are sorted in
alphabetical order by module names.
Those who prefer to build ITK using the command line are referred to the online cmake command-line tool
documentation .
Only some typical use cases are shown here for reference.
- Example 1: Build all default modules.
cmake [-DITK_BUILD_DEFAULT_MODULES:BOOL=ON] ../ITK-build As ITK_BUILD_DEFAULT_MODULES is ON by default, the above can also be accomplished by
- Example 2: Enable specific group(s) of modules.
cmake -DITK_BUILD_DEFAULT_MODULES:BOOL=OFF -DBUILD_EXAMPLES:BOOL=OFF
-DITKGroup_{Group1}:BOOL=ON [-DITKGroup_{Group2}:BOOL=ON] ../ITK-build where ITKGroup_GroupN could be, for example, ITKGroup_Filtering or ITKGroup_Registration
for the Filtering and Registration groups, respectively.
- Example 3: Enable specific modules.
cmake -DITK_BUILD_DEFAULT_MODULES:BOOL=OFF -DBUILD_EXAMPLES:BOOL=OFF
-DModule_{Module1}:BOOL=ON [-DModule_{Module2}:BOOL=ON] ../ITK-build where Module_Module1 could be, for example, Module_ITKFEM for the non-default, built-in FEM
module, or Module_Cuberille for the Cuberille remote module.
- Example 4: Enable examples.
cmake -DITK_BUILD_DEFAULT_MODULES:BOOL=ON -DBUILD_EXAMPLES:BOOL=ON ../ITK-build Note that BUILD_EXAMPLES is OFF by default, and BUILD_EXAMPLES=ON requires
ITK_BUILD_DEFAULT_MODULES=ON.
2.2.4 Static and Shared Libraries
ITK libraries can be built as static libraries, i.e. files whose functions and variables are included in a binary
during the link phase of the build cycle. Alternatively, ITK libraries can be built as shared libraries, where
libraries are dynamically linked to a binary. In this case, functions and variables are shared at runtime
according to their symbols.
By enabling the standard CMake configuration variable, BUILD_SHARED_LIBS, ITK modules with the
ENABLE_SHARED option (see Section 9.1) will be built as shared libraries.
Static libraries are preferred when creating a stand-alone executable. An application can be distributed as a
single file when statically linked. Additional effort is not required to package library dependencies,
configure the system to find library dependencies at runtime, or define symbol export specifications.
However, care should be taken to only link static libraries once into the binaries used by an application.
Failure to due so can result in duplicated global variables and, consequently, undefined or undesirable
behavior.
Shared libraries should be used when ITK is linked to more than one binary in an application. This reduces
binary size and ensures that singleton variables are unique across the application.
An advanced CMake configuration variable, ITK_TEMPLATE_VISIBILITY_DEFAULT defines the symbol
visibility attribute on template classes to default on systems that require it to perform dynamic_cast’s on
pointers passed across binaries. The default value can be disabled only when it is known that template
classes are not implicitly instantiated and passed across binaries.
2.2.5 Compiling ITK
To initiate the build process after generating the build files on Linux or UNIX, simply type make in the
terminal if the current directory is set to the ITK binary directory. If using Visual Studio, first load
the workspace named ITK.sln from the binary directory specified in the CMake GUI and
then start the build by selecting “Build Solution” from the “Build” menu or right-clicking on
the ALL_BUILD target in the Solution Explorer pane and selecting the “Build” context menu
item.
The build process can take anywhere from 15 minutes to a couple of hours, depending on the
build configuration and the performance of your system. If testing is enabled as part of the
normal build process, about 2400 test programs will be compiled. In this case, you will then
need to run ctest to verify that all the components of ITK have been correctly built on your
system.
2.2.6 Installing ITK on Your System
When the build process is complete an ITK binary distribution package can be generated for installation on
your system or on a system with compatible specifications (such as hardware platform and operating
system) as well as suitable development environment components (such as C++ compiler and CMake). The
default prefix for installation destination directory needs to be specified during CMake configuration
process prior to compiling ITK. The installation destination prefix can to be set through the CMake cache
variable CMAKE_INSTALL_PREFIX.
Typically distribution packages are generated to provide a “clean” form of the software which is isolated
from the details of the build process (separate from the source and build trees). Due to the intended use of
ITK as a toolkit for software development the step of generating ITK binary packages for installing ITK on
other systems has limited application and thus it can be treated as optional. However, the step for generating
binary distribution packages has a much wide application for distributing software developed with ITK.
Further details on configuring and generating binary packages with CMake can be found in the CMake
tutorial .
2.3 Cross compiling ITK
This section describes the procedure to follow to cross compile ITK for another system. Cross compiling
involves a build system, the system where the executables are built, and the target system, the system where
the executables are intended to run.
Currently, the best way to cross-compile ITK is to use dockcross.
For example, the commands to build for Linux-ARMv7 are:
git clone https://github.com/InsightSoftwareConsortium/ITK docker run --rm dockcross/linux-armv7 > ./dockcross-linux-armv7
chmod +x ./dockcross-linux-armv7 mkdir ITK-build ./dockcross-linux-armv7 cmake -BITK-build -HITK -GNinja
./dockcross-linux-armv7 ninja -CITK-build
2.4 Getting Started With ITK
The simplest way to create a new project with ITK is to create two new directories somewhere in your
disk, one to hold the source code and one to hold the binaries and other files that are created in
the build process. For this example, create a HelloWorldITK directory to hold the source and
a HelloWorldITK-build directory to hold the binaries. The first file to place in the source
directory is a CMakeLists.txt file that will be used by CMake to generate a Makefile (if you are
using Linux or UNIX) or a Visual Studio workspace (if you are using Microsoft Windows). The
second source file to be created is an actual C++ program that will exercise some of the large
number of classes available in ITK. The details of these files are described in the following
section.
Once both files are in your directory you can run CMake in order to configure your project. Under
UNIX/Linux, you can cd to your newly created binary directory and launch the terminal-based version of
CMake by entering “ccmake ../HelloWorldITK” in the terminal. Note the “../HelloWorldITK” in the
command line to indicate that the CMakeLists.txt file is up one directory and in HelloWorldITK. In
CMake GUI which can be used under Microsoft Windows and UNIX/Linux, the source and
binary directories will have to be specified prior to the configuration and build file generation
process.
Both the terminal-based and GUI versions of CMake will require you to specify the directory where ITK
was built in the CMake variable ITK_DIR. The ITK binary directory will contain a file named
ITKConfig.cmake generated during ITK configuration process with CMake. From this file, CMake will
recover all information required to configure your new ITK project.
After generating the build files, on UNIX/Linux systems the project can be compiled by typing make in the
terminal provided the current directory is set to the project’s binary directory. In Visual Studio on Microsoft
Windows the project can be built by loading the workspace named HelloWorldITK.sln from the binary
directory specified in the CMake GUI and selecting “Build Solution” from the “Build” menu or by
right-clicking on the ALL_BUILD target in the Solution Explorer pane and selecting the “Build” context
menu item.
The resulting executable, which will be called HelloWorld, can be executed on the command line. If on
Microsoft Windows, please note that double-clicking on the icon of the executable will quickly launch a
command line window, run the executable and close the window right away, not giving you time to see the
output. It is therefore preferable to run the executable from the DOS command line by starting the cmd.exe
shell first.
2.5 Using ITK as an External Library
For a project that uses ITK as an external library, it is recommended to specify the individual ITK modules
in the COMPONENTS argument in the find_package CMake command:
find_package(ITK REQUIRED COMPONENTS Module1 Module2) include(\${ITK_USE_FILE})
e.g.
find_package(ITK REQUIRED COMPONENTS MorphologicalContourInterpolation ITKSmoothing
ITKIOImageBase ITKIONRRD ) include(\${ITK_USE_FILE})
If you would like to use the CMake ExternalProject
Module
to download ITK source code when building your ITK application (a.k.a. Superbuild ITK),
here is a basic CMake snippet for setting up a Superbuild in an ITK application project using
CMake:
ExternalProject_Add(ITK GIT_REPOSITORY \${git_protocol}://github.com/InsightSoftwareConsortium/ITK.git"
GIT_TAG "<tag id>" # specify the commit id or the tag id SOURCE_DIR <ITK source tree path>
BINARY_DIR <ITK build tree path> CMAKE_GENERATOR ${gen} CMAKE_ARGS ${ep_common_args}
-DBUILD_SHARED_LIBS:BOOL=OFF -DBUILD_EXAMPLES:BOOL=OFF -DBUILD_TESTING:BOOL=OFF
-DITK_BUILD_DEFAULT_MODULES:BOOL=ON [-DModule_LevelSetv4Visualization:BOOL=ON] INSTALL_COMMAND ""
DEPENDS [VTK] [DCMTK] # if some of the modules requested require extra third party libraries )
More exemplary configurations for superbuild ITK projects can be found in:
Slicer ,
BrainsTools , ITK
Wiki Examples , ITK
Sphinx Examples , and
ITK Software Guide .
2.5.1 Hello World!
This section provides and explains the contents of the two files which need to be created for your new
project. These two files can be found in the ITK/Examples/Installation directory.
The CMakeLists.txt file contains the following lines:
project(HelloWorld) find_package(ITK REQUIRED) include(${ITK_USE_FILE})
add_executable(HelloWorld HelloWorld.cxx) target_link_libraries(HelloWorld ${ITK_LIBRARIES})
The first line defines the name of your project as it appears in Visual Studio or Eclipse; this line will have no
effect with UNIX/Linux Makefiles. The second line loads a CMake file with a predefined strategy for
finding ITK. If the strategy for finding ITK fails, CMake will report an error which can be corrected by
providing the location of the directory where ITK was compiled or installed on your system. In this case the
path to the ITK’s binary/installation directory needs to be specified as the value of the ITK_DIR CMake
variable. The line include(${USE_ITK_FILE}) loads the UseITK.cmake file which contains the
configuration information about the specified ITK build. The line starting with add_executable call
defines as its first argument the name of the executable that will be produced as result of this project. The
remaining argument(s) of add_executable are the names of the source files to be compiled. Finally,
the target_link_libraries call specifies which ITK libraries will be linked against this
project. Further details on creating and configuring CMake projects can be found in the CMake
tutorial and CMake
online documentation .
The source code for this section can be found in the file
HelloWorld.cxx.
The following code is an implementation of a small ITK program. It tests including header files and linking
with ITK libraries.
#include "itkImage.h" #include <iostream> int main() { using ImageType = itk::Image< unsigned short, 3 >;
ImageType::Pointer image = ImageType::New(); std::cout << "ITK Hello World !" << std::endl; return EXIT_SUCCESS; }
This code instantiates a 3D image
whose pixels are represented with type unsigned short. The image is then constructed and assigned to a
itk::SmartPointer. Although later in the text we will discuss SmartPointers in detail, for now think of
it as a handle on an instance of an object (see section 3.2.4 for more information). The itk::Image class
will be described in Section 4.1.
By this point you have successfully configured and compiled ITK, and created your first simple
program! If you have experienced any difficulties while following the instructions provided in this
section, please join the community discussion (see Section 1.4 on page 12) and post questions
there.