The next section is a brief introduction that defines iterators in the context of ITK. Section 6.2 describes the programming interface common to most ITK image iterators. Sections 6.3–6.4 document specific ITK iterator types and provide examples of how they are used.
Generic programming models define functionally independent components called containers and algorithms. Container objects store data and algorithms operate on data. To access data in containers, algorithms use a third class of objects called iterators. An iterator is an abstraction of a memory pointer. Every container type must define its own iterator type, but all iterators are written to provide a common interface so that algorithm code can reference data in a generic way and maintain functional independence from containers.
The iterator is so named because it is used for iterative, sequential access of container values. Iterators appear in for and while loop constructs, visiting each data point in turn. A C pointer, for example, is a type of iterator. It can be moved forward (incremented) and backward (decremented) through memory to sequentially reference elements of an array. Many iterator implementations have an interface similar to a C pointer.
In ITK we use iterators to write generic image processing code for images instantiated with different combinations of pixel type, pixel container type, and dimensionality. Because ITK image iterators are specifically designed to work with image containers, their interface and implementation is optimized for image processing tasks. Using the ITK iterators instead of accessing data directly through the itk::Image interface has many advantages. Code is more compact and often generalizes automatically to higher dimensions, algorithms run much faster, and iterators simplify tasks such as multithreading and neighborhood-based image processing.
This section describes the standard ITK image iterator programming interface. Some specialized image iterators may deviate from this standard or provide additional methods.
All image iterators have at least one template parameter that is the image type over which they iterate. There is no restriction on the dimensionality of the image or on the pixel type of the image.
An iterator constructor requires at least two arguments, a smart pointer to the image to iterate across, and an image region. The image region, called the iteration region, is a rectilinear area in which iteration is constrained. The iteration region must be wholly contained within the image. More specifically, a valid iteration region is any subregion of the image within the current BufferedRegion. See Section 4.1 for more information on image regions.
There is a const and a non-const version of most ITK image iterators. A non-const iterator cannot be instantiated on a non-const image pointer. Const versions of iterators may read, but may not write pixel values.
Here is a simple example that defines and constructs a simple image iterator for an itk::Image.
using ConstIteratorType = itk::ImageRegionConstIterator< ImageType >;
using IteratorType = itk::ImageRegionIterator< ImageType >;
ImageType::Pointer image = SomeFilter->GetOutput();
ConstIteratorType constIterator( image, image->GetRequestedRegion() );
IteratorType iterator( image, image->GetRequestedRegion() );
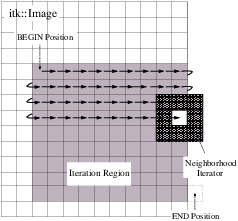
An iterator is described as walking its iteration region. At any time, the iterator will reference, or “point to”, one pixel location in the N-dimensional (ND) image. Forward iteration goes from the beginning of the iteration region to the end of the iteration region. Reverse iteration, goes from just past the end of the region back to the beginning. There are two corresponding starting positions for iterators, the begin position and the end position. An iterator can be moved directly to either of these two positions using the following methods.
Note that the end position is not actually located within the iteration region. This is important to remember because attempting to dereference an iterator at its end position will have undefined results.
ITK iterators are moved back and forth across their iterations using the decrement and increment operators.
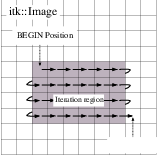
Figure 6.1 illustrates typical iteration over an image region. Most iterators increment and decrement in the direction of the fastest increasing image dimension, wrapping to the first position in the next higher dimension at region boundaries. In other words, an iterator first moves across columns, then down rows, then from slice to slice, and so on.

In addition to sequential iteration through the image, some iterators may define random access operators. Unlike the increment operators, random access operators may not be optimized for speed and require some knowledge of the dimensionality of the image and the extent of the iteration region to use properly.
The SetPosition() method may be extremely slow for more complicated iterator types. In general, it should only be used for setting a starting iteration position, like you would use GoToBegin() or GoToEnd().
Some iterators do not follow a predictable path through their iteration regions and have no fixed beginning or ending pixel locations. A conditional iterator, for example, visits pixels only if they have certain values or connectivities. Random iterators, increment and decrement to random locations and may even visit a given pixel location more than once.
An iterator can be queried to determine if it is at the end or the beginning of its iteration region.
An iterator can also report its current image index position.
For efficiency, most ITK image iterators do not perform bounds checking. It is possible to move an iterator outside of its valid iteration region. Dereferencing an out-of-bounds iterator will produce undefined results.
ITK image iterators define two basic methods for reading and writing pixel values.
The Get() and Set() methods are inlined and optimized for speed so that their use is equivalent to dereferencing the image buffer directly. There are a few common cases, however, where using Get() and Set() do incur a penalty. Consider the following code, which fetches, modifies, and then writes a value back to the same pixel location.
As written, this code requires one more memory dereference than is necessary. Some iterators define a third data access method that avoids this penalty.
The Value() method can be used as either an lval or an rval in an expression. It has all the properties of operator⋆. The Value() method makes it possible to rewrite our example code more efficiently.
Consider using the Value() method instead of Get() or Set() when a call to operator= on a pixel is non-trivial, such as when working with vector pixels, and operations are done in-place in the image. The disadvantage of using Value is that it cannot support image adapters (see Section 7 on page 251 for more information about image adaptors).
Using the methods described in the previous sections, we can now write a simple example to do pixel-wise operations on an image. The following code calculates the squares of all values in an input image and writes them to an output image.
Notice that both the input and output iterators are initialized over the same region, the RequestedRegion of inputImage. This is good practice because it ensures that the output iterator walks exactly the same set of pixel indices as the input iterator, but does not require that the output and input be the same size. The only requirement is that the input image must contain a region (a starting index and size) that matches the RequestedRegion of the output image.
Equivalent code can be written by iterating through the image in reverse. The syntax is slightly more awkward because the end of the iteration region is not a valid position and we can only test whether the iterator is strictly equal to its beginning position. It is often more convenient to write reverse iteration in a while loop.
This section describes iterators that walk rectilinear image regions and reference a single pixel at a time. The itk::ImageRegionIterator is the most basic ITK image iterator and the first choice for most applications. The rest of the iterators in this section are specializations of ImageRegionIterator that are designed make common image processing tasks more efficient or easier to implement.
The source code for this section can be found in the file
ImageRegionIterator.cxx.
The itk::ImageRegionIterator is optimized for iteration speed and is the first choice for iterative, pixel-wise operations when location in the image is not important. ImageRegionIterator is the least specialized of the ITK image iterator classes. It implements all of the methods described in the preceding section.
The following example illustrates the use of itk::ImageRegionConstIterator and ImageRegionIterator. Most of the code constructs introduced apply to other ITK iterators as well. This simple application crops a subregion from an image by copying its pixel values into to a second, smaller image.
We begin by including the appropriate header files.
Next we define a pixel type and corresponding image type. ITK iterator classes expect the image type as their template parameter.
Information about the subregion to copy is read from the command line. The subregion is defined by an itk::ImageRegion object, with a starting grid index and a size (Section 4.1).
ImageType::RegionType::IndexType inputStart;
ImageType::RegionType::SizeType size;
inputStart[0] = ::std::stoi( argv[3] );
inputStart[1] = ::std::stoi( argv[4] );
size[0] = ::std::stoi( argv[5] );
size[1] = ::std::stoi( argv[6] );
inputRegion.SetSize( size );
inputRegion.SetIndex( inputStart );
The destination region in the output image is defined using the input region size, but a different start index. The starting index for the destination region is the corner of the newly generated image.
After reading the input image and checking that the desired subregion is, in fact, contained in the input, we allocate an output image. It is fundamental to set valid values to some of the basic image information during the copying process. In particular, the starting index of the output region is now filled up with zero values and the coordinates of the physical origin are computed as a shift from the origin of the input image. This is quite important since it will allow us to later register the extracted region against the original image.
outputImage->SetRegions( outputRegion );
const ImageType::SpacingType& spacing = reader->GetOutput()->GetSpacing();
const ImageType::PointType& inputOrigin = reader->GetOutput()->GetOrigin();
double outputOrigin[ Dimension ];
for(unsigned int i=0; i< Dimension; i++)
{
outputOrigin[i] = inputOrigin[i] + spacing[i] ⋆ inputStart[i];
}
outputImage->SetSpacing( spacing );
outputImage->SetOrigin( outputOrigin );
outputImage->Allocate();
The necessary images and region definitions are now in place. All that is left to do is to create the iterators and perform the copy. Note that image iterators are not accessed via smart pointers so they are light-weight objects that are instantiated on the stack. Also notice how the input and output iterators are defined over the same corresponding region. Though the images are different sizes, they both contain the same target subregion.
The while loop above is a common construct in ITK. The beauty of these four lines of code is that they are equally valid for one, two, three, or even ten dimensional data, and no knowledge of the size of the image is necessary. Consider the ugly alternative of ten nested for loops for traversing an image.
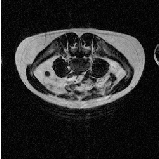
Let’s run this example on the image FatMRISlice.png found in Examples/Data. The command line arguments specify the input and output file names, then the x, y origin and the x, y size of the cropped subregion.
The output is the cropped subregion shown in Figure 6.2.

The source code for this section can be found in the file
ImageRegionIteratorWithIndex.cxx.
The “WithIndex” family of iterators was designed for algorithms that use both the value and the location of image pixels in calculations. Unlike itk::ImageRegionIterator, which calculates an index only when asked for, itk::ImageRegionIteratorWithIndex maintains its index location as a member variable that is updated during the increment or decrement process. Iteration speed is penalized, but the index queries are more efficient.
The following example illustrates the use of ImageRegionIteratorWithIndex. The algorithm mirrors a 2D image across its x-axis (see itk::FlipImageFilter for an ND version). The algorithm makes extensive use of the GetIndex() method.
We start by including the proper header file.
For this example, we will use an RGB pixel type so that we can process color images. Like most other ITK image iterator, ImageRegionIteratorWithIndex class expects the image type as its single template parameter.
An ImageType smart pointer called inputImage points to the output of the image reader. After updating the image reader, we can allocate an output image of the same size, spacing, and origin as the input image.
Next we create the iterator that walks the output image. This algorithm requires no iterator for the input image.
This axis flipping algorithm works by iterating through the output image, querying the iterator for its index, and copying the value from the input at an index mirrored across the x-axis.
outputImage->GetRequestedRegion().GetIndex();
ImageType::SizeType requestedSize =
outputImage->GetRequestedRegion().GetSize();
for ( outputIt.GoToBegin(); !outputIt.IsAtEnd(); ++outputIt)
{
ImageType::IndexType idx = outputIt.GetIndex();
idx[0] = requestedIndex[0] + requestedSize[0] - 1 - idx[0];
outputIt.Set( inputImage->GetPixel(idx) );
}
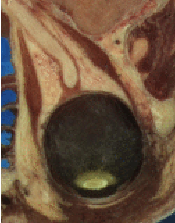
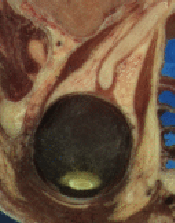
Let’s run this example on the image VisibleWomanEyeSlice.png found in the Examples/Data directory. Figure 6.3 shows how the original image has been mirrored across its x-axis in the output.
The source code for this section can be found in the file
ImageLinearIteratorWithIndex.cxx.
The itk::ImageLinearIteratorWithIndex is designed for line-by-line processing of an image. It walks a linear path along a selected image direction parallel to one of the coordinate axes of the image. This iterator conceptually breaks an image into a set of parallel lines that span the selected image dimension.
Like all image iterators, movement of the ImageLinearIteratorWithIndex is constrained within an image region R. The line ℓ through which the iterator moves is defined by selecting a direction and an origin. The line ℓ extends from the origin to the upper boundary of R. The origin can be moved to any position along the lower boundary of R.
Several additional methods are defined for this iterator to control movement of the iterator along the line ℓ and movement of the origin of ℓ.
The following code example shows how to use the ImageLinearIteratorWithIndex. It implements the same algorithm as in the previous example, flipping an image across its x-axis. Two line iterators are iterated in opposite directions across the x-axis. After each line is traversed, the iterator origins are stepped along the y-axis to the next line.
Headers for both the const and non-const versions are needed.
The RGB image and pixel types are defined as in the previous example. The ImageLinearIteratorWithIndex class and its const version each have single template parameters, the image type.
After reading the input image, we allocate an output image that of the same size, spacing, and origin.
Next we create the two iterators. The const iterator walks the input image, and the non-const iterator walks the output image. The iterators are initialized over the same region. The direction of iteration is set to 0, the x dimension.
Each line in the input is copied to the output. The input iterator moves forward across columns while the output iterator moves backwards.
Running this example on VisibleWomanEyeSlice.png produces the same output image shown in Figure 6.3.
The source code for this section can be found in the file
ImageLinearIteratorWithIndex2.cxx.
This example shows how to use the itk::ImageLinearIteratorWithIndex for computing the mean across time of a 4D image where the first three dimensions correspond to spatial coordinates and the fourth dimension corresponds to time. The result of the mean across time is to be stored in a 3D image.
First we declare the types of the images, the 3D and 4D readers.
Next, define the necessary types for indices, points, spacings, and size.
using Index3DType = Image3DType::IndexType;
using Size3DType = Image3DType::SizeType;
using Region3DType = Image3DType::RegionType;
using Spacing3DType = Image3DType::SpacingType;
using Origin3DType = Image3DType::PointType;
using Index4DType = Image4DType::IndexType;
using Size4DType = Image4DType::SizeType;
using Spacing4DType = Image4DType::SpacingType;
using Origin4DType = Image4DType::PointType;
Here we make sure that the values for our resultant 3D mean image match up with the input 4D image.
{
size3D[i] = size4D[i];
index3D[i] = index4D[i];
spacing3D[i] = spacing4D[i];
origin3D[i] = origin4D[i];
}
image3D->SetSpacing( spacing3D );
image3D->SetOrigin( origin3D );
Region3DType region3D;
region3D.SetIndex( index3D );
region3D.SetSize( size3D );
image3D->SetRegions( region3D );
image3D->Allocate();
Next we iterate over time in the input image series, compute the average, and store that value in the corresponding pixel of the output 3D image.
it.SetDirection( 3 ); // Walk along time dimension
it.GoToBegin();
while( !it.IsAtEnd() )
{
SumType sum = itk::NumericTraits< SumType >::ZeroValue();
it.GoToBeginOfLine();
index4D = it.GetIndex();
while( !it.IsAtEndOfLine() )
{
sum += it.Get();
++it;
}
MeanType mean = static_cast< MeanType >( sum ) /
static_cast< MeanType >( timeLength );
index3D[0] = index4D[0];
index3D[1] = index4D[1];
index3D[2] = index4D[2];
image3D->SetPixel( index3D, static_cast< PixelType >( mean ) );
it.NextLine();
}
As you can see, we avoid to use a 3D iterator to walk over the mean image. The reason is that there is no guarantee that the 3D iterator will walk in the same order as the 4D. Iterators just adhere to their contract of visiting every pixel, but do not enforce any particular order for the visits. The linear iterator guarantees it will visit the pixels along a line of the image in the order in which they are placed in the line, but does not state in what order one line will be visited with respect to other lines. Here we simply take advantage of knowing the first three components of the 4D iterator index, and use them to place the resulting mean value in the output 3D image.
The source code for this section can be found in the file
ImageSliceIteratorWithIndex.cxx.
The itk::ImageSliceIteratorWithIndex class is an extension of itk::ImageLinearIteratorWithIndex from iteration along lines to iteration along both lines and planes in an image. A slice is a 2D plane spanned by two vectors pointing along orthogonal coordinate axes. The slice orientation of the slice iterator is defined by specifying its two spanning axes.
Several new methods control movement from slice to slice.
The slice iterator moves line by line using NextLine() and PreviousLine(). The line direction is parallel to the second coordinate axis direction of the slice plane (see also Section 6.3.3).
The next code example calculates the maximum intensity projection along one of the coordinate axes of an image volume. The algorithm is straightforward using ImageSliceIteratorWithIndex because we can coordinate movement through a slice of the 3D input image with movement through the 2D planar output.
Here is how the algorithm works. For each 2D slice of the input, iterate through all the pixels line by line. Copy a pixel value to the corresponding position in the 2D output image if it is larger than the value already contained there. When all slices have been processed, the output image is the desired maximum intensity projection.
We include a header for the const version of the slice iterator. For writing values to the 2D projection image, we use the linear iterator from the previous section. The linear iterator is chosen because it can be set to follow the same path in its underlying 2D image that the slice iterator follows over each slice of the 3D image.
The pixel type is defined as unsigned short. For this application, we need two image types, a 3D image for the input, and a 2D image for the intensity projection.
A slice iterator type is defined to walk the input image.
The projection direction is read from the command line. The projection image will be the size of the 2D plane orthogonal to the projection direction. Its spanning vectors are the two remaining coordinate axes in the volume. These axes are recorded in the direction array.
The direction array is now used to define the projection image size based on the input image size. The output image is created so that its common dimension(s) with the input image are the same size. For example, if we project along the x axis of the input, the size and origin of the y axes of the input and output will match. This makes the code slightly more complicated, but prevents a counter-intuitive rotation of the output.
ImageType2D::RegionType::SizeType size;
ImageType2D::RegionType::IndexType index;
ImageType3D::RegionType requestedRegion = inputImage->GetRequestedRegion();
index[ direction[0] ] = requestedRegion.GetIndex()[ direction[0] ];
index[ 1- direction[0] ] = requestedRegion.GetIndex()[ direction[1] ];
size[ direction[0] ] = requestedRegion.GetSize()[ direction[0] ];
size[ 1- direction[0] ] = requestedRegion.GetSize()[ direction[1] ];
region.SetSize( size );
region.SetIndex( index );
ImageType2D::Pointer outputImage = ImageType2D::New();
outputImage->SetRegions( region );
outputImage->Allocate();
Next we create the necessary iterators. The const slice iterator walks the 3D input image, and the non-const linear iterator walks the 2D output image. The iterators are initialized to walk the same linear path through a slice. Remember that the second direction of the slice iterator defines the direction that linear iteration walks within a slice.
Now we are ready to compute the projection. The first step is to initialize all of the projection values to their nonpositive minimum value. The projection values are then updated row by row from the first slice of the input. At the end of the first slice, the input iterator steps to the first row in the next slice, while the output iterator, whose underlying image consists of only one slice, rewinds to its first row. The process repeats until the last slice of the input is processed.
while ( ! outputIt.IsAtEnd() )
{
while ( ! outputIt.IsAtEndOfLine() )
{
outputIt.Set( itk::NumericTraits<unsigned short>::NonpositiveMin() );
++outputIt;
}
outputIt.NextLine();
}
inputIt.GoToBegin();
outputIt.GoToBegin();
while( !inputIt.IsAtEnd() )
{
while ( !inputIt.IsAtEndOfSlice() )
{
while ( !inputIt.IsAtEndOfLine() )
{
outputIt.Set( std::max( outputIt.Get(), inputIt.Get() ));
++inputIt;
++outputIt;
}
outputIt.NextLine();
inputIt.NextLine();
}
outputIt.GoToBegin();
inputIt.NextSlice();
}
Running this example code on the 3D image Examples/Data/BrainProtonDensity3Slices.mha using the z-axis as the axis of projection gives the image shown in Figure 6.4.
The source code for this section can be found in the file
ImageRandomConstIteratorWithIndex.cxx.
itk::ImageRandomConstIteratorWithIndex was developed to randomly sample pixel values. When incremented or decremented, it jumps to a random location in its image region.
The user must specify a sample size when creating this iterator. The sample size, rather than a specific image index, defines the end position for the iterator. IsAtEnd() returns true when the current sample number equals the sample size. IsAtBegin() returns true when the current sample number equals zero. An important difference from other image iterators is that ImageRandomConstIteratorWithIndex may visit the same pixel more than once.
Let’s use the random iterator to estimate some simple image statistics. The next example calculates an estimate of the arithmetic mean of pixel values.
First, include the appropriate header and declare pixel and image types.
The input image has been read as inputImage. We now create an iterator with a number of samples set by command line argument. The call to ReinitializeSeed seeds the random number generator. The iterator is initialized over the entire valid image region.
Now take the specified number of samples and calculate their average value.
The following table shows the results of running this example on several of the data files from Examples/Data with a range of sample sizes.
| Sample Size
| ||||
| 10 | 100 | 1000 | 10000 | |
| RatLungSlice1.mha | 50.5 | 52.4 | 53.0 | 52.4 |
| RatLungSlice2.mha | 46.7 | 47.5 | 47.4 | 47.6 |
| BrainT1Slice.png | 47.2 | 64.1 | 68.0 | 67.8 |
In ITK, a pixel neighborhood is loosely defined as a small set of pixels that are locally adjacent to one another in an image. The size and shape of a neighborhood, as well the connectivity among pixels in a neighborhood, may vary with the application.
Many image processing algorithms are neighborhood-based, that is, the result at a pixel i is computed from the values of pixels in the ND neighborhood of i. Consider finite difference operations in 2D. A derivative at pixel index i = (j,k), for example, is taken as a weighted difference of the values at (j+1,k) and (j-1,k). Other common examples of neighborhood operations include convolution filtering and image morphology.
This section describes a class of ITK image iterators that are designed for working with pixel neighborhoods. An ITK neighborhood iterator walks an image region just like a normal image iterator, but instead of only referencing a single pixel at each step, it simultaneously points to the entire ND neighborhood of pixels. Extensions to the standard iterator interface provide read and write access to all neighborhood pixels and information such as the size, extent, and location of the neighborhood.
Neighborhood iterators use the same operators defined in Section 6.2 and the same code constructs as normal iterators for looping through an image. Figure 6.5 shows a neighborhood iterator moving through an iteration region. This iterator defines a 3x3 neighborhood around each pixel that it visits. The center of the neighborhood iterator is always positioned over its current index and all other neighborhood pixel indices are referenced as offsets from the center index. The pixel under the center of the neighborhood iterator and all pixels under the shaded area, or extent, of the iterator can be dereferenced.
In addition to the standard image pointer and iteration region (Section 6.2), neighborhood iterator constructors require an argument that specifies the extent of the neighborhood to cover. Neighborhood extent is symmetric across its center in each axis and is given as an array of N distances that are collectively called the radius. Each element d of the radius, where 0 < d < N and N is the dimensionality of the neighborhood, gives the extent of the neighborhood in pixels for dimension N. The length of each face of the resulting ND hypercube is 2d +1 pixels, a distance of d on either side of the single pixel at the neighbor center. Figure 6.6 shows the relationship between the radius of the iterator and the size of the neighborhood for a variety of 2D iterator shapes.
The radius of the neighborhood iterator is queried after construction by calling the GetRadius() method. Some other methods provide some useful information about the iterator and its underlying image.
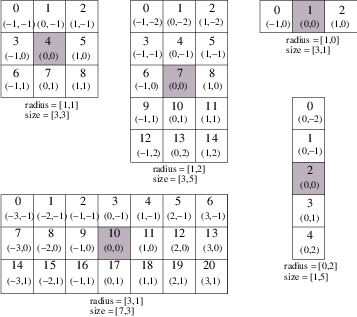
The neighborhood iterator interface extends the normal ITK iterator interface for setting and getting pixel values. One way to dereference pixels is to think of the neighborhood as a linear array where each pixel has a unique integer index. The index of a pixel in the array is determined by incrementing from the upper-left-forward corner of the neighborhood along the fastest increasing image dimension: first column, then row, then slice, and so on. In Figure 6.6, the unique integer index is shown at the top of each pixel. The center pixel is always at position n∕2, where n is the size of the array.
Another way to think about a pixel location in a neighborhood is as an ND offset from the neighborhood center. The upper-left-forward corner of a 3x3x3 neighborhood, for example, can be described by offset (-1,-1,-1). The bottom-right-back corner of the same neighborhood is at offset (1,1,1). In Figure 6.6, the offset from center is shown at the bottom of each neighborhood pixel.
The neighborhood iterators also provide a shorthand for setting and getting the value at the center of the neighborhood.
There is another shorthand for setting and getting values for pixels that lie some integer distance from the neighborhood center along one of the image axes.
It is also possible to extract or set all of the neighborhood values from an iterator at once using a regular ITK neighborhood object. This may be useful in algorithms that perform a particularly large number of calculations in the neighborhood and would otherwise require multiple dereferences of the same pixels.
Several methods are defined to provide information about the neighborhood.
A neighborhood-based calculation in a neighborhood close to an image boundary may require data that falls outside the boundary. The iterator in Figure 6.5, for example, is centered on a boundary pixel such that three of its neighbors actually do not exist in the image. When the extent of a neighborhood falls outside the image, pixel values for missing neighbors are supplied according to a rule, usually chosen to satisfy the numerical requirements of the algorithm. A rule for supplying out-of-bounds values is called a boundary condition.
ITK neighborhood iterators automatically detect out-of-bounds dereferences and will return values according to boundary conditions. The boundary condition type is specified by the second, optional template parameter of the iterator. By default, neighborhood iterators use a Neumann condition where the first derivative across the boundary is zero. The Neumann rule simply returns the closest in-bounds pixel value to the requested out-of-bounds location. Several other common boundary conditions can be found in the ITK toolkit. They include a periodic condition that returns the pixel value from the opposite side of the data set, and is useful when working with periodic data such as Fourier transforms, and a constant value condition that returns a set value v for all out-of-bounds pixel dereferences. The constant value condition is equivalent to padding the image with value v.
Bounds checking is a computationally expensive operation because it occurs each time the iterator is incremented. To increase efficiency, a neighborhood iterator automatically disables bounds checking when it detects that it is not necessary. A user may also explicitly disable or enable bounds checking. Most neighborhood based algorithms can minimize the need for bounds checking through clever definition of iteration regions. These techniques are explored in Section 6.4.1.
The following sections describe the two ITK neighborhood iterator classes, itk::NeighborhoodIterator and itk::ShapedNeighborhoodIterator. Each has a const and a non-const version. The shaped iterator is a refinement of the standard NeighborhoodIterator that supports an arbitrarily-shaped (non-rectilinear) neighborhood.
The standard neighborhood iterator class in ITK is the itk::NeighborhoodIterator. Together with its const version, itk::ConstNeighborhoodIterator, it implements the complete API described above. This section provides several examples to illustrate the use of NeighborhoodIterator.
The source code for this section can be found in the file
NeighborhoodIterators1.cxx.
This example uses the itk::NeighborhoodIterator to implement a simple Sobel edge detection algorithm [?]. The algorithm uses the neighborhood iterator to iterate through an input image and calculate a series of finite difference derivatives. Since the derivative results cannot be written back to the input image without affecting later calculations, they are written instead to a second, output image. Most neighborhood processing algorithms follow this read-only model on their inputs.
We begin by including the proper header files. The itk::ImageRegionIterator will be used to write the results of computations to the output image. A const version of the neighborhood iterator is used because the input image is read-only.
The finite difference calculations in this algorithm require floating point values. Hence, we define the image pixel type to be float and the file reader will automatically cast fixed-point data to float.
We declare the iterator types using the image type as the template parameter. The second template parameter of the neighborhood iterator, which specifies the boundary condition, has been omitted because the default condition is appropriate for this algorithm.
The following code creates and executes the ITK image reader. The Update call on the reader object is surrounded by the standard try/catch blocks to handle any exceptions that may be thrown by the reader.
We can now create a neighborhood iterator to range over the output of the reader. For Sobel edge-detection in 2D, we need a square iterator that extends one pixel away from the neighborhood center in every dimension.
The following code creates an output image and iterator.
Sobel edge detection uses weighted finite difference calculations to construct an edge magnitude image. Normally the edge magnitude is the root sum of squares of partial derivatives in all directions, but for simplicity this example only calculates the x component. The result is a derivative image biased toward maximally vertical edges.
The finite differences are computed from pixels at six locations in the neighborhood. In this example, we use the iterator GetPixel() method to query the values from their offsets in the neighborhood. The example in Section 6.4.1 uses convolution with a Sobel kernel instead.
Six positions in the neighborhood are necessary for the finite difference calculations. These positions are recorded in offset1 through offset6.
NeighborhoodIteratorType::OffsetType offset2 = {{1,-1}};
NeighborhoodIteratorType::OffsetType offset3 = {{-1,0 }};
NeighborhoodIteratorType::OffsetType offset4 = {{1,0}};
NeighborhoodIteratorType::OffsetType offset5 = {{-1,1}};
NeighborhoodIteratorType::OffsetType offset6 = {{1,1}};
It is equivalent to use the six corresponding integer array indices instead. For example, the offsets (-1,-1) and (1, -1) are equivalent to the integer indices 0 and 2, respectively.
The calculations are done in a for loop that moves the input and output iterators synchronously across their respective images. The sum variable is used to sum the results of the finite differences.
The last step is to write the output buffer to an image file. Writing is done inside a try/catch block to handle any exceptions. The output is rescaled to intensity range [0,255] and cast to unsigned char so that it can be saved and visualized as a PNG image.
using WriteImageType = itk::Image< WritePixelType, 2 >;
using WriterType = itk::ImageFileWriter< WriteImageType >;
using RescaleFilterType = itk::RescaleIntensityImageFilter<
ImageType, WriteImageType >;
RescaleFilterType::Pointer rescaler = RescaleFilterType::New();
rescaler->SetOutputMinimum( 0 );
rescaler->SetOutputMaximum( 255 );
rescaler->SetInput(output);
WriterType::Pointer writer = WriterType::New();
writer->SetFileName( argv[2] );
writer->SetInput(rescaler->GetOutput());
try
{
writer->Update();
}
catch ( itk::ExceptionObject &err)
{
std::cerr << "ExceptionObject caught !" << std::endl;
std::cerr << err << std::endl;
return EXIT_FAILURE;
}
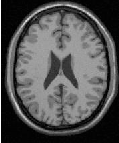
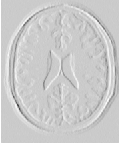
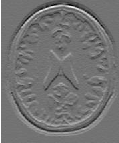
The center image of Figure 6.7 shows the output of the Sobel algorithm applied to Examples/Data/BrainT1Slice.png.
The source code for this section can be found in the file
NeighborhoodIterators2.cxx.
In this example, the Sobel edge-detection routine is rewritten using convolution filtering. Convolution filtering is a standard image processing technique that can be implemented numerically as the inner product of all image neighborhoods with a convolution kernel [?] [?]. In ITK, we use a class of objects called neighborhood operators as convolution kernels and a special function object called itk::NeighborhoodInnerProduct to calculate inner products.
The basic ITK convolution filtering routine is to step through the image with a neighborhood iterator and use NeighborhoodInnerProduct to find the inner product of each neighborhood with the desired kernel. The resulting values are written to an output image. This example uses a neighborhood operator called the itk::SobelOperator, but all neighborhood operators can be convolved with images using this basic routine. Other examples of neighborhood operators include derivative kernels, Gaussian kernels, and morphological operators. itk::NeighborhoodOperatorImageFilter is a generalization of the code in this section to ND images and arbitrary convolution kernels.
We start writing this example by including the header files for the Sobel kernel and the inner product function.
Refer to the previous example for a description of reading the input image and setting up the output image and iterator.
The following code creates a Sobel operator. The Sobel operator requires a direction for its partial derivatives. This direction is read from the command line. Changing the direction of the derivatives changes the bias of the edge detection, i.e. maximally vertical or maximally horizontal.
The neighborhood iterator is initialized as before, except that now it takes its radius directly from the radius of the Sobel operator. The inner product function object is templated over image type and requires no initialization.
Using the Sobel operator, inner product, and neighborhood iterator objects, we can now write a very simple for loop for performing convolution filtering. As before, out-of-bounds pixel values are supplied automatically by the iterator.
The output is rescaled and written as in the previous example. Applying this example in the x and y directions produces the images at the center and right of Figure 6.7. Note that x-direction operator produces the same output image as in the previous example.
The source code for this section can be found in the file
NeighborhoodIterators3.cxx.
This example illustrates a technique for improving the efficiency of neighborhood calculations by eliminating unnecessary bounds checking. As described in Section 6.4, the neighborhood iterator automatically enables or disables bounds checking based on the iteration region in which it is initialized. By splitting our image into boundary and non-boundary regions, and then processing each region using a different neighborhood iterator, the algorithm will only perform bounds-checking on those pixels for which it is actually required. This trick can provide a significant speedup for simple algorithms such as our Sobel edge detection, where iteration speed is a critical.
Splitting the image into the necessary regions is an easy task when you use the itk::NeighborhoodAlgorithm::ImageBoundaryFacesCalculator. The face calculator is so named because it returns a list of the “faces” of the ND dataset. Faces are those regions whose pixels all lie within a distance d from the boundary, where d is the radius of the neighborhood stencil used for the numerical calculations. In other words, faces are those regions where a neighborhood iterator of radius d will always overlap the boundary of the image. The face calculator also returns the single inner region, in which out-of-bounds values are never required and bounds checking is not necessary.
The face calculator object is defined in itkNeighborhoodAlgorithm.h. We include this file in addition to those from the previous two examples.
First we load the input image and create the output image and inner product function as in the previous examples. The image iterators will be created in a later step. Next we create a face calculator object. An empty list is created to hold the regions that will later on be returned by the face calculator.
The face calculator function is invoked by passing it an image pointer, an image region, and a neighborhood radius. The image pointer is the same image used to initialize the neighborhood iterator, and the image region is the region that the algorithm is going to process. The radius is the radius of the iterator.
Notice that in this case the image region is given as the region of the output image and the image pointer is given as that of the input image. This is important if the input and output images differ in size, i.e. the input image is larger than the output image. ITK image filters, for example, operate on data from the input image but only generate results in the RequestedRegion of the output image, which may be smaller than the full extent of the input.
The face calculator has returned a list of 2N +1 regions. The first element in the list is always the inner region, which may or may not be important depending on the application. For our purposes it does not matter because all regions are processed the same way. We use an iterator to traverse the list of faces.
We now rewrite the main loop of the previous example so that each region in the list is processed by a separate iterator. The iterators it and out are reinitialized over each region in turn. Bounds checking is automatically enabled for those regions that require it, and disabled for the region that does not.
NeighborhoodIteratorType it;
for ( fit=faceList.begin(); fit != faceList.end(); ++fit)
{
it = NeighborhoodIteratorType( sobelOperator.GetRadius(),
reader->GetOutput(), ⋆fit );
out = IteratorType( output, ⋆fit );
for (it.GoToBegin(), out.GoToBegin(); ! it.IsAtEnd(); ++it, ++out)
{
out.Set( innerProduct(it, sobelOperator) );
}
}
The output is written as before. Results for this example are the same as the previous example. You may not notice the speedup except on larger images. When moving to 3D and higher dimensions, the effects are greater because the volume to surface area ratio is usually larger. In other words, as the number of interior pixels increases relative to the number of face pixels, there is a corresponding increase in efficiency from disabling bounds checking on interior pixels.
The source code for this section can be found in the file
NeighborhoodIterators4.cxx.
We now introduce a variation on convolution filtering that is useful when a convolution kernel is separable. In this example, we create a different neighborhood iterator for each axial direction of the image and then take separate inner products with a 1D discrete Gaussian kernel. The idea of using several neighborhood iterators at once has applications beyond convolution filtering and may improve efficiency when the size of the whole neighborhood relative to the portion of the neighborhood used in calculations becomes large.
The only new class necessary for this example is the Gaussian operator.
The Gaussian operator, like the Sobel operator, is instantiated with a pixel type and a dimensionality. Additionally, we set the variance of the Gaussian, which has been read from the command line as standard deviation.
The only further changes from the previous example are in the main loop. Once again we use the results from face calculator to construct a loop that processes boundary and non-boundary image regions separately. Separable convolution, however, requires an additional, outer loop over all the image dimensions. The direction of the Gaussian operator is reset at each iteration of the outer loop using the new dimension. The iterators change direction to match because they are initialized with the radius of the Gaussian operator.
Input and output buffers are swapped at each iteration so that the output of the previous iteration becomes the input for the current iteration. The swap is not performed on the last iteration.
for (unsigned int i = 0; i < ImageType::ImageDimension; ++i)
{
gaussianOperator.SetDirection(i);
gaussianOperator.CreateDirectional();
faceList = faceCalculator(input, output->GetRequestedRegion(),
gaussianOperator.GetRadius());
for ( fit=faceList.begin(); fit != faceList.end(); ++fit )
{
it = NeighborhoodIteratorType( gaussianOperator.GetRadius(),
input, ⋆fit );
out = IteratorType( output, ⋆fit );
for (it.GoToBegin(), out.GoToBegin(); ! it.IsAtEnd(); ++it, ++out)
{
out.Set( innerProduct(it, gaussianOperator) );
}
}
// Swap the input and output buffers
if (i != ImageType::ImageDimension - 1)
{
ImageType::Pointer tmp = input;
input = output;
output = tmp;
}
}
The output is rescaled and written as in the previous examples. Figure 6.8 shows the results of Gaussian blurring the image Examples/Data/BrainT1Slice.png using increasing kernel widths.


The source code for this section can be found in the file
NeighborhoodIterators5.cxx.
This example introduces slice-based neighborhood processing. A slice, in this context, is a 1D path through an ND neighborhood. Slices are defined for generic arrays by the std::slice class as a start index, a step size, and an end index. Slices simplify the implementation of certain neighborhood calculations. They also provide a mechanism for taking inner products with subregions of neighborhoods.
Suppose, for example, that we want to take partial derivatives in the y direction of a neighborhood, but offset those derivatives by one pixel position along the positive x direction. For a 3×3, 2D neighborhood iterator, we can construct an std::slice, (start = 2, stride = 3, end = 8), that represents the neighborhood offsets (1,-1), (1,0), (1,1) (see Figure 6.6). If we pass this slice as an extra argument to the itk::NeighborhoodInnerProduct function, then the inner product is taken only along that slice. This “sliced” inner product with a 1D itk::DerivativeOperator gives the desired derivative.
The previous separable Gaussian filtering example can be rewritten using slices and slice-based inner products. In general, slice-based processing is most useful when doing many different calculations on the same neighborhood, where defining multiple iterators as in Section 6.4.1 becomes impractical or inefficient. Good examples of slice-based neighborhood processing can be found in any of the ND anisotropic diffusion function objects, such as itk::CurvatureNDAnisotropicDiffusionFunction.
The first difference between this example and the previous example is that the Gaussian operator is only initialized once. Its direction is not important because it is only a 1D array of coefficients.
Next we need to define a radius for the iterator. The radius in all directions matches that of the single extent of the Gaussian operator, defining a square neighborhood.
The inner product and face calculator are defined for the main processing loop as before, but now the iterator is reinitialized each iteration with the square radius instead of the radius of the operator. The inner product is taken using a slice along the axial direction corresponding to the current iteration. Note the use of GetSlice() to return the proper slice from the iterator itself. GetSlice() can only be used to return the slice along the complete extent of the axial direction of a neighborhood.
faceList = faceCalculator(input, output->GetRequestedRegion(), radius);
for (unsigned int i = 0; i < ImageType::ImageDimension; ++i)
{
for ( fit=faceList.begin(); fit != faceList.end(); ++fit )
{
it = NeighborhoodIteratorType( radius, input, ⋆fit );
out = IteratorType( output, ⋆fit );
for (it.GoToBegin(), out.GoToBegin(); ! it.IsAtEnd(); ++it, ++out)
{
out.Set( innerProduct(it.GetSlice(i), it, gaussianOperator) );
}
}
// Swap the input and output buffers
if (i != ImageType::ImageDimension - 1)
{
ImageType::Pointer tmp = input;
input = output;
output = tmp;
}
}
This technique produces exactly the same results as the previous example. A little experimentation, however, will reveal that it is less efficient since the neighborhood iterator is keeping track of extra, unused pixel locations for each iteration, while the previous example only references those pixels that it needs. In cases, however, where an algorithm takes multiple derivatives or convolution products over the same neighborhood, slice-based processing can increase efficiency and simplify the implementation.
The source code for this section can be found in the file
NeighborhoodIterators6.cxx.
Some image processing routines do not need to visit every pixel in an image. Flood-fill and connected-component algorithms, for example, only visit pixels that are locally connected to one another. Algorithms such as these can be efficiently written using the random access capabilities of the neighborhood iterator.
The following example finds local minima. Given a seed point, we can search the neighborhood of that point and pick the smallest value m. While m is not at the center of our current neighborhood, we move in the direction of m and repeat the analysis. Eventually we discover a local minimum and stop. This algorithm is made trivially simple in ND using an ITK neighborhood iterator.
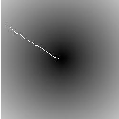
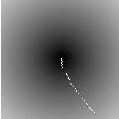
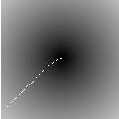
To illustrate the process, we create an image that descends everywhere to a single minimum: a positive distance transform to a point. The details of creating the distance transform are not relevant to the discussion of neighborhood iterators, but can be found in the source code of this example. Some noise has been added to the distance transform image for additional interest.
The variable input is the pointer to the distance transform image. The local minimum algorithm is initialized with a seed point read from the command line.
Next we create the neighborhood iterator and position it at the seed point.
Searching for the local minimum involves finding the minimum in the current neighborhood, then shifting the neighborhood in the direction of that minimum. The for loop below records the itk::Offset of the minimum neighborhood pixel. The neighborhood iterator is then moved using that offset. When a local minimum is detected, flag will remain false and the while loop will exit. Note that this code is valid for an image of any dimensionality.
while ( flag == true )
{
NeighborhoodIteratorType::OffsetType nextMove;
nextMove.Fill(0);
flag = false;
PixelType min = it.GetCenterPixel();
for (unsigned i = 0; i < it.Size(); i++)
{
if ( it.GetPixel(i) < min )
{
min = it.GetPixel(i);
nextMove = it.GetOffset(i);
flag = true;
}
}
it.SetCenterPixel( 255.0 );
it += nextMove;
}
Figure 6.9 shows the results of the algorithm for several seed points. The white line is the path of the iterator from the seed point to the minimum in the center of the image. The effect of the additive noise is visible as the small perturbations in the paths.
This section describes a variation on the neighborhood iterator called a shaped neighborhood iterator. A shaped neighborhood is defined like a bit mask, or stencil, with different offsets in the rectilinear neighborhood of the normal neighborhood iterator turned off or on to create a pattern. Inactive positions (those not in the stencil) are not updated during iteration and their values cannot be read or written. The shaped iterator is implemented in the class itk::ShapedNeighborhoodIterator, which is a subclass of itk::NeighborhoodIterator. A const version, itk::ConstShapedNeighborhoodIterator, is also available.
Like a regular neighborhood iterator, a shaped neighborhood iterator must be initialized with an ND radius object, but the radius of the neighborhood of a shaped iterator only defines the set of possible neighbors. Any number of possible neighbors can then be activated or deactivated. The shaped neighborhood iterator defines an API for activating neighbors. When a neighbor location, defined relative to the center of the neighborhood, is activated, it is placed on the active list and is then part of the stencil. An iterator can be “reshaped” at any time by adding or removing offsets from the active list.
Because the neighborhood is less rigidly defined in the shaped iterator, the set of pixel access methods is restricted. Only the GetPixel() and SetPixel() methods are available, and calling these methods on an inactive neighborhood offset will return undefined results.
For the common case of traversing all pixel offsets in a neighborhood, the shaped iterator class provides an iterator through the active offsets in its stencil. This stencil iterator can be incremented or decremented and defines Get() and Set() for reading and writing the values in the neighborhood.
The functionality and interface of the shaped neighborhood iterator is best described by example. We will use the ShapedNeighborhoodIterator to implement some binary image morphology algorithms (see [?], [?], et al.). The examples that follow implement erosion and dilation.
The source code for this section can be found in the file
ShapedNeighborhoodIterators1.cxx.
This example uses itk::ShapedNeighborhoodIterator to implement a binary erosion algorithm. If we think of an image I as a set of pixel indices, then erosion of I by a smaller set E, called the structuring element, is the set of all indices at locations x in I such that when E is positioned at x, every element in E is also contained in I.
This type of algorithm is easy to implement with shaped neighborhood iterators because we can use the iterator itself as the structuring element E and move it sequentially through all positions x. The result at x is obtained by checking values in a simple iteration loop through the neighborhood stencil.
We need two iterators, a shaped iterator for the input image and a regular image iterator for writing results to the output image.
Since we are working with binary images in this example, an unsigned char pixel type will do. The image and iterator types are defined using the pixel type.
Refer to the examples in Section 6.4.1 or the source code of this example for a description of how to read the input image and allocate a matching output image.
The size of the structuring element is read from the command line and used to define a radius for the shaped neighborhood iterator. Using the method developed in section 6.4.1 to minimize bounds checking, the iterator itself is not initialized until entering the main processing loop.
The face calculator object introduced in Section 6.4.1 is created and used as before.
itk::NeighborhoodAlgorithm::ImageBoundaryFacesCalculator<ImageType>;
FaceCalculatorType faceCalculator;
FaceCalculatorType::FaceListType faceList;
FaceCalculatorType::FaceListType::iterator fit;
faceList = faceCalculator( reader->GetOutput(),
output->GetRequestedRegion(),
radius );
Now we initialize some variables and constants.
The outer loop of the algorithm is structured as in previous neighborhood iterator examples. Each region in the face list is processed in turn. As each new region is processed, the input and output iterators are initialized on that region.
The shaped iterator that ranges over the input is our structuring element and its active stencil must be created accordingly. For this example, the structuring element is shaped like a circle of radius element_radius. Each of the appropriate neighborhood offsets is activated in the double for loop.
{
ShapedNeighborhoodIteratorType it( radius, reader->GetOutput(), ⋆fit );
out = IteratorType( output, ⋆fit );
// Creates a circular structuring element by activating all the pixels less
// than radius distance from the center of the neighborhood.
for (float y = -rad; y <= rad; y++)
{
for (float x = -rad; x <= rad; x++)
{
ShapedNeighborhoodIteratorType::OffsetType off;
float dis = std::sqrt( x⋆x + y⋆y );
if (dis <= rad)
{
off[0] = static_cast<int>(x);
off[1] = static_cast<int>(y);
it.ActivateOffset(off);
}
}
}
The inner loop, which implements the erosion algorithm, is fairly simple. The for loop steps the input and output iterators through their respective images. At each step, the active stencil of the shaped iterator is traversed to determine whether all pixels underneath the stencil contain the foreground value, i.e. are contained within the set I. Note the use of the stencil iterator, ci, in performing this check.
for (it.GoToBegin(), out.GoToBegin(); !it.IsAtEnd(); ++it, ++out)
{
ShapedNeighborhoodIteratorType::ConstIterator ci;
bool flag = true;
for (ci = it.Begin(); ci != it.End(); ci++)
{
if (ci.Get() == background_value)
{
flag = false;
break;
}
}
if (flag == true)
{
out.Set(foreground_value);
}
else
{
out.Set(background_value);
}
}
}
The source code for this section can be found in the file
ShapedNeighborhoodIterators2.cxx.
The logic of the inner loop can be rewritten to perform dilation. Dilation of the set I by E is the set of all x such that E positioned at x contains at least one element in I.
for (it.GoToBegin(), out.GoToBegin(); !it.IsAtEnd(); ++it, ++out)
{
ShapedNeighborhoodIteratorType::ConstIterator ci;
bool flag = false;
for (ci = it.Begin(); ci != it.End(); ci++)
{
if (ci.Get() != background_value)
{
flag = true;
break;
}
}
if (flag == true)
{
out.Set(foreground_value);
}
else
{
out.Set(background_value);
}
}
}
The output image is written and visualized directly as a binary image of unsigned chars. Figure 6.10 illustrates some results of erosion and dilation on the image Examples/Data/BinaryImage.png. Applying erosion and dilation in sequence effects the morphological operations of opening and closing.


