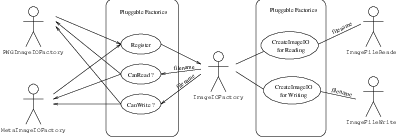
Figure 1.1: Collaboration diagram of the ImageIO classes.
This chapter describes the toolkit architecture supporting reading and writing of images to files. ITK does not enforce any particular file format, instead, it provides a structure supporting a variety of formats that can be easily extended by the user as new formats become available.
We begin the chapter with some simple examples of file I/O.
The source code for this section can be found in the file
ImageReadWrite.cxx.
The classes responsible for reading and writing images are located at the beginning and end of the data processing pipeline. These classes are known as data sources (readers) and data sinks (writers). Generally speaking they are referred to as filters, although readers have no pipeline input and writers have no pipeline output.
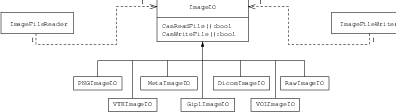
The reading of images is managed by the class itk::ImageFileReader while writing is performed by the class itk::ImageFileWriter. These two classes are independent of any particular file format. The actual low level task of reading and writing specific file formats is done behind the scenes by a family of classes of type itk::ImageIO.
The first step for performing reading and writing is to include the following headers.
Then, as usual, a decision must be made about the type of pixel used to represent the image processed by the pipeline. Note that when reading and writing images, the pixel type of the image is not necessarily the same as the pixel type stored in the file. Your choice of the pixel type (and hence template parameter) should be driven mainly by two considerations:
A typical selection for medical images is illustrated in the following lines.
Note that the dimension of the image in memory should match that of the image in the file. There are a couple of special cases in which this condition may be relaxed, but in general it is better to ensure that both dimensions match.
We can now instantiate the types of the reader and writer. These two classes are parameterized over the image type.
Then, we create one object of each type using the New() method and assign the result to a itk::SmartPointer.
The name of the file to be read or written is passed to the SetFileName() method.
We can now connect these readers and writers to filters to create a pipeline. For example, we can create a short pipeline by passing the output of the reader directly to the input of the writer.
At first glance this may look like a quite useless program, but it is actually implementing a powerful file format conversion tool! The execution of the pipeline is triggered by the invocation of the Update() methods in one of the final objects. In this case, the final data pipeline object is the writer. It is a wise practice of defensive programming to insert any Update() call inside a try/catch block in case exceptions are thrown during the execution of the pipeline.
Note that exceptions should only be caught by pieces of code that know what to do with them. In a typical application this catch block should probably reside in the GUI code. The action on the catch block could inform the user about the failure of the IO operation.
The IO architecture of the toolkit makes it possible to avoid explicit specification of the file format used to read or write images.1 The object factory mechanism enables the ImageFileReader and ImageFileWriter to determine (at run-time) which file format it is working with. Typically, file formats are chosen based on the filename extension, but the architecture supports arbitrarily complex processes to determine whether a file can be read or written. Alternatively, the user can specify the data file format by explicit instantiation and assignment of the appropriate itk::ImageIO subclass.
For historical reasons and as a convenience to the user, the itk::ImageFileWriter also has a Write() method that is aliased to the Update() method. You can in principle use either of them but Update() is recommended since Write() may be deprecated in the future.
To better understand the IO architecture, please refer to Figures 1.1, 1.2, and 1.3.
The following section describes the internals of the IO architecture provided in the toolkit.
The principle behind the input/output mechanism used in ITK is known as pluggable-factories [20]. This concept is illustrated in the UML diagram in Figure 1.1. From the user’s point of view the objects responsible for reading and writing files are the itk::ImageFileReader and itk::ImageFileWriter classes. These two classes, however, are not aware of the details involved in reading or writing particular file formats like PNG or DICOM. What they do is dispatch the user’s requests to a set of specific classes that are aware of the details of image file formats. These classes are the itk::ImageIO classes. The ITK delegation mechanism enables users to extend the number of supported file formats by just adding new classes to the ImageIO hierarchy.
Each instance of ImageFileReader and ImageFileWriter has a pointer to an ImageIO object. If this pointer is empty, it will be impossible to read or write an image and the image file reader/writer must determine which ImageIO class to use to perform IO operations. This is done basically by passing the filename to a centralized class, the itk::ImageIOFactory and asking it to identify any subclass of ImageIO capable of reading or writing the user-specified file. This is illustrated by the use cases on the right side of Figure 1.2. The ImageIOFactory acts here as a dispatcher that helps locate the actual IO factory classes corresponding to each file format.
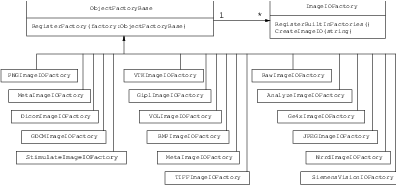
Each class derived from ImageIO must provide an associated factory class capable of producing an instance of the ImageIO class. For example, for PNG files, there is a itk::PNGImageIO object that knows how to read this image files and there is a itk::PNGImageIOFactory class capable of constructing a PNGImageIO object and returning a pointer to it. Each time a new file format is added (i.e., a new ImageIO subclass is created), a factory must be implemented as a derived class of the ObjectFactoryBase class as illustrated in Figure 1.3.
For example, in order to read PNG files, a PNGImageIOFactory is created and registered with the central ImageIOFactory singleton2 class as illustrated in the left side of Figure 1.2. When the ImageFileReader asks the ImageIOFactory for an ImageIO capable of reading the file identified with filename the ImageIOFactory will iterate over the list of registered factories and will ask each one of them if they know how to read the file. The factory that responds affirmatively will be used to create the specific ImageIO instance that will be returned to the ImageFileReader and used to perform the read operations.
In most cases the mechanism is transparent to the user who only interacts with the ImageFileReader and ImageFileWriter. It is possible, however, to explicitly select the type of ImageIO object to use. This is illustrated by the following example.
The source code for this section can be found in the file
ImageReadExportVTK.cxx.
In cases where the user knows what file format to use and wants to indicate this explicitly, a specific itk::ImageIO class can be instantiated and assigned to the image file reader or writer. This circumvents the itk::ImageIOFactory mechanism which tries to find the appropriate ImageIO class for performing the IO operations. Explicit selection of the ImageIO also allows the user to invoke specialized features of a particular class which may not be available from the general API provided by ImageIO.
The following example illustrates explicit instantiation of an IO class (in this case a VTK file format), setting its parameters and then connecting it to the itk::ImageFileWriter.
The example begins by including the appropriate headers.
Then, as usual, we select the pixel types and the image dimension. Remember, if the file format represents pixels with a particular type, C-style casting will be performed to convert the data.
We can now instantiate the reader and writer. These two classes are parameterized over the image type. We instantiate the itk::VTKImageIO class as well. Note that the ImageIO objects are not templated.
Then, we create one object of each type using the New() method and assigning the result to a itk::SmartPointer.
The name of the file to be read or written is passed with the SetFileName() method.
We can now connect these readers and writers to filters in a pipeline. For example, we can create a short pipeline by passing the output of the reader directly to the input of the writer.
Explicitly declaring the specific VTKImageIO allow users to invoke methods specific to a particular IO class. For example, the following line specifies to the writer to use ASCII format when writing the pixel data.
The VTKImageIO object is then connected to the ImageFileWriter. This will short-circuit the action of the ImageIOFactory mechanism. The ImageFileWriter will not attempt to look for other ImageIO objects capable of performing the writing tasks. It will simply invoke the one provided by the user.
Finally we invoke Update() on the ImageFileWriter and place this call inside a try/catch block in case any errors occur during the writing process.
Although this example only illustrates how to use an explicit ImageIO class with the ImageFileWriter, the same can be done with the ImageFileReader. The typical case in which this is done is when reading raw image files with the itk::RawImageIO object. The drawback of this approach is that the parameters of the image have to be explicitly written in the code. The direct use of raw files is strongly discouraged in medical imaging. It is always better to create a header for a raw file by using any of the file formats that combine a text header file and a raw binary file, like itk::MetaImageIO, itk::GiplImageIO and itk::VTKImageIO.
The source code for this section can be found in the file
RGBImageReadWrite.cxx.
RGB images are commonly used for representing data acquired from cryogenic sections, optical microscopy and endoscopy. This example illustrates how to read and write RGB color images to and from a file. This requires the following headers as shown.
The itk::RGBPixel class is templated over the type used to represent each one of the red, green and blue components. A typical instantiation of the RGB image class might be as follows.
The image type is used as a template parameter to instantiate the reader and writer.
The filenames of the input and output files must be provided to the reader and writer respectively.
Finally, execution of the pipeline can be triggered by invoking the Update() method in the writer.
You may have noticed that apart from the declaration of the PixelType there is nothing in this code specific to RGB images. All the actions required to support color images are implemented internally in the itk::ImageIO objects.
The source code for this section can be found in the file
ImageReadCastWrite.cxx.
Given that ITK is based on the Generic Programming paradigm, most of the types are defined at compilation time. It is sometimes important to anticipate conversion between different types of images. The following example illustrates the common case of reading an image of one pixel type and writing it as a different pixel type. This process not only involves casting but also rescaling the image intensity since the dynamic range of the input and output pixel types can be quite different. The itk::RescaleIntensityImageFilter is used here to linearly rescale the image values.
The first step in this example is to include the appropriate headers.
Then, as usual, a decision should be made about the pixel type that should be used to represent the images. Note that when reading an image, this pixel type is not necessarily the pixel type of the image stored in the file. Instead, it is the type that will be used to store the image as soon as it is read into memory.
Note that the dimension of the image in memory should match the one of the image in the file. There are a couple of special cases in which this condition may be relaxed, but in general it is better to ensure that both dimensions match.
We can now instantiate the types of the reader and writer. These two classes are parameterized over the image type.
Below we instantiate the RescaleIntensityImageFilter class that will linearly scale the image intensities.
A filter object is constructed and the minimum and maximum values of the output are selected using the SetOutputMinimum() and SetOutputMaximum() methods.
Then, we create the reader and writer and connect the pipeline.
The name of the files to be read and written are passed with the SetFileName() method.
Finally we trigger the execution of the pipeline with the Update() method on the writer. The output image will then be the scaled and cast version of the input image.
The source code for this section can be found in the file
ImageReadRegionOfInterestWrite.cxx.
This example should arguably be placed in the previous filtering chapter. However its usefulness for typical IO operations makes it interesting to mention here. The purpose of this example is to read an image, extract a subregion and write this subregion to a file. This is a common task when we want to apply a computationally intensive method to the region of interest of an image.
As usual with ITK IO, we begin by including the appropriate header files.
The itk::RegionOfInterestImageFilter is the filter used to extract a region from an image. Its header is included below.
Image types are defined below.
The types for the itk::ImageFileReader and itk::ImageFileWriter are instantiated using the image types.
The RegionOfInterestImageFilter type is instantiated using the input and output image types. A filter object is created with the New() method and assigned to a itk::SmartPointer.
The RegionOfInterestImageFilter requires a region to be defined by the user. The region is specified by an itk::Index indicating the pixel where the region starts and an itk::Size indicating how many pixels the region has along each dimension. In this example, the specification of the region is taken from the command line arguments (this example assumes that a 2D image is being processed).
An itk::ImageRegion object is created and initialized with start and size obtained from the command line.
Then the region is passed to the filter using the SetRegionOfInterest() method.
Below, we create the reader and writer using the New() method and assign the result to a itk::SmartPointer.
The name of the file to be read or written is passed with the SetFileName() method.
Below we connect the reader, filter and writer to form the data processing pipeline.
Finally we execute the pipeline by invoking Update() on the writer. The call is placed in a try/catch block in case exceptions are thrown.
The source code for this section can be found in the file
ImageReadExtractWrite.cxx.
This example illustrates the common task of extracting a 2D slice from a 3D volume. This is typically used for display purposes and for expediting user feedback in interactive programs. Here we simply read a 3D volume, extract one of its slices and save it as a 2D image. Note that caution should be used when working with 2D slices from a 3D dataset, since for most image processing operations, the application of a filter on an extracted slice is not equivalent to first applying the filter in the volume and then extracting the slice.
In this example we start by including the appropriate header files.
The filter used to extract a region from an image is the itk::ExtractImageFilter. Its header is included below. This filter is capable of extracting (N -1)-dimensional images from N-dimensional ones.
Image types are defined below. Note that the input image type is 3D and the output image type is 2D.
The types for the itk::ImageFileReader and itk::ImageFileWriter are instantiated using the image types.
Below, we create the reader and writer using the New() method and assign the result to a itk::SmartPointer.
The name of the file to be read or written is passed with the SetFileName() method.
The ExtractImageFilter type is instantiated using the input and output image types. A filter object is created with the New() method and assigned to a itk::SmartPointer.
The ExtractImageFilter requires a region to be defined by the user. The region is specified by an itk::Index indicating the pixel where the region starts and an itk::Size indicating how many pixels the region has along each dimension. In order to extract a 2D image from a 3D data set, it is enough to set the size of the region to 0 in one dimension. This will indicate to ExtractImageFilter that a dimensional reduction has been specified. Here we take the region from the largest possible region of the input image. Note that UpdateOutputInformation() is being called first on the reader. This method updates the metadata in the output image without actually reading in the bulk-data.
We take the size from the region and collapse the size in the Z component by setting its value to 0. This will indicate to the ExtractImageFilter that the output image should have a dimension less than the input image.
Note that in this case we are extracting a Z slice, and for that reason, the dimension to be collapsed is the one with index 2. You may keep in mind the association of index components {X = 0,Y = 1,Z = 2}. If we were interested in extracting a slice perpendicular to the Y axis we would have set size[1]=0;.
Then, we take the index from the region and set its Z value to the slice number we want to extract. In this example we obtain the slice number from the command line arguments.
Finally, an itk::ImageRegion object is created and initialized with the start and size we just prepared using the slice information.
Then the region is passed to the filter using the SetExtractionRegion() method.
Below we connect the reader, filter and writer to form the data processing pipeline.
Finally we execute the pipeline by invoking Update() on the writer. The call is placed in a try/catch block in case exceptions are thrown.
Images whose pixel type is a Vector, a CovariantVector, an Array, or a Complex are quite common in image processing. It is convenient then to describe rapidly how those images can be saved into files and how they can be read from those files later on.
The source code for this section can be found in the file
VectorImageReadWrite.cxx.
This example illustrates how to read and write an image of pixel type itk::Vector.
We should include the header files for the Image, the ImageFileReader and the ImageFileWriter.
Then we define the specific type of vector to be used as pixel type.
We define the image dimension, and along with the pixel type we use it for fully instantiating the image type.
Having the image type at hand, we can instantiate the reader and writer types, and use them for creating one object of each type.
A filename must be provided to both the reader and the writer. In this particular case we take those filenames from the command line arguments.
This being a minimal example, we create a short pipeline where we simply connect the output of the reader to the input of the writer.
The execution of this short pipeline is triggered by invoking the writer’s Update() method. This invocation must be placed inside a try/catch block since its execution may result in exceptions being thrown.
Of course, you could envision the addition of filters in between the reader and the writer. Those filters could perform operations on the vector image.
The source code for this section can be found in the file
CovariantVectorImageWrite.cxx.
This example illustrates how to write an image whose pixel type is CovariantVector. For practical purposes all the content in this example is applicable to images of pixel type itk::Vector, itk::Point and itk::FixedArray. These pixel types are similar in that they are all arrays of fixed size in which the components have the same representational type.
In order to make this example a bit more interesting we setup a pipeline to read an image, compute its gradient and write the gradient to a file. Gradients are represented with itk::CovariantVectors as opposed to Vectors. In this way, gradients are transformed correctly under itk::AffineTransforms or in general, any transform having anisotropic scaling.
Let’s start by including the relevant header files.
We use the itk::GradientRecursiveGaussianImageFilter in order to compute the image gradient. The output of this filter is an image whose pixels are CovariantVectors.
We read an image of signed short pixels and compute the gradient to produce an image of CovariantVectors where each component is of type float.
using InputPixelType = signed short;
using ComponentType = float;
constexpr unsigned int Dimension = 2;
using OutputPixelType = itk::CovariantVector< ComponentType,
Dimension >;
using InputImageType = itk::Image< InputPixelType, Dimension >;
using OutputImageType = itk::Image< OutputPixelType, Dimension >;
The itk::ImageFileReader and itk::ImageFileWriter are instantiated using the image types.
The GradientRecursiveGaussianImageFilter class is instantiated using the input and output image types. A filter object is created with the New() method and assigned to a itk::SmartPointer.
We select a value for the σ parameter of the GradientRecursiveGaussianImageFilter. Note that σ for this filter is specified in millimeters.
Below, we create the reader and writer using the New() method and assign the result to a itk::SmartPointer.
The name of the file to be read or written is passed to the SetFileName() method.
Below we connect the reader, filter and writer to form the data processing pipeline.
Finally we execute the pipeline by invoking Update() on the writer. The call is placed in a try/catch block in case exceptions are thrown.
Let’s now take the image that we just created and read it into another program.
The source code for this section can be found in the file
CovariantVectorImageRead.cxx.
This example illustrates how to read an image whose pixel type is CovariantVector. For practical purposes this example is applicable to images of pixel type itk::Vector, itk::Point and itk::FixedArray. These pixel types are similar in that they are all arrays of fixed size in which the components have the same representation type.
In this example we are reading a gradient image from a file (written in the previous example) and computing its magnitude using the itk::VectorMagnitudeImageFilter. Note that this filter is different from the itk::GradientMagnitudeImageFilter which actually takes a scalar image as input and computes the magnitude of its gradient. The VectorMagnitudeImageFilter class takes an image of vector pixel type as input and computes pixel-wise the magnitude of each vector.
Let’s start by including the relevant header files.
We read an image of itk::CovariantVector pixels and compute pixel magnitude to produce an image where each pixel is of type unsigned short. The components of the CovariantVector are selected to be float here. Notice that a renormalization is required in order to map the dynamic range of the magnitude values into the range of the output pixel type. The itk::RescaleIntensityImageFilter is used to achieve this.
using ComponentType = float;
constexpr unsigned int Dimension = 2;
using InputPixelType = itk::CovariantVector< ComponentType,
Dimension >;
using MagnitudePixelType = float;
using OutputPixelType = unsigned short;
using InputImageType = itk::Image< InputPixelType, Dimension >;
using MagnitudeImageType = itk::Image< MagnitudePixelType, Dimension >;
using OutputImageType = itk::Image< OutputPixelType, Dimension >;
The itk::ImageFileReader and itk::ImageFileWriter are instantiated using the image types.
The VectorMagnitudeImageFilter is instantiated using the input and output image types. A filter object is created with the New() method and assigned to a itk::SmartPointer.
The RescaleIntensityImageFilter class is instantiated next.
In the following the minimum and maximum values for the output image are specified. Note the use of the itk::NumericTraits class which allows us to define a number of type-related constants in a generic way. The use of traits is a fundamental characteristic of generic programming [5, 1].
Below, we create the reader and writer using the New() method and assign the result to a itk::SmartPointer.
The name of the file to be read or written is passed with the SetFileName() method.
Below we connect the reader, filter and writer to form the data processing pipeline.
Finally we execute the pipeline by invoking Update() on the writer. The call is placed in a try/catch block in case exceptions are thrown.
The source code for this section can be found in the file
ComplexImageReadWrite.cxx.
This example illustrates how to read and write an image of pixel type std::complex. The complex type is defined as an integral part of the C++ language. The characteristics of the type are specified in the C++ standard document in Chapter 26 ”Numerics Library”, page 565, in particular in section 26.2 [4].
We start by including the headers of the complex class, the image, and the reader and writer classes.
The image dimension and pixel type must be declared. In this case we use the std::complex<> as the pixel type. Using the dimension and pixel type we proceed to instantiate the image type.
The image file reader and writer types are instantiated using the image type. We can then create objects for both of them.
File names should be provided for both the reader and the writer. In this particular example we take those file names from the command line arguments.
Here we simply connect the output of the reader as input to the writer. This simple program could be used for converting complex images from one file format to another.
The execution of this short pipeline is triggered by invoking the Update() method of the writer. This invocation must be placed inside a try/catch block since its execution may result in exceptions being thrown.
For a more interesting use of this code, you may want to add a filter in between the reader and the writer and perform any complex image to complex image operation. A practical application of this code is presented in section 2.10 in the context of Fourier analysis.
The source code for this section can be found in the file
CovariantVectorImageExtractComponent.cxx.
This example illustrates how to read an image whose pixel type is CovariantVector, extract one of its components to form a scalar image and finally save this image into a file.
The itk::VectorIndexSelectionCastImageFilter is used to extract a scalar from the vector image. It is also possible to cast the component type when using this filter. It is the user’s responsibility to make sure that the cast will not result in any information loss.
Let’s start by including the relevant header files.
We read an image of itk::CovariantVector pixels and extract one of its components to generate a scalar image of a consistent pixel type. Then, we rescale the intensities of this scalar image and write it as an image of unsigned short pixels.
using ComponentType = float;
constexpr unsigned int Dimension = 2;
using InputPixelType = itk::CovariantVector< ComponentType,
Dimension >;
using OutputPixelType = unsigned short;
using InputImageType = itk::Image< InputPixelType, Dimension >;
using ComponentImageType = itk::Image< ComponentType, Dimension >;
using OutputImageType = itk::Image< OutputPixelType, Dimension >;
The itk::ImageFileReader and itk::ImageFileWriter are instantiated using the image types.
The VectorIndexSelectionCastImageFilter is instantiated using the input and output image types. A filter object is created with the New() method and assigned to a itk::SmartPointer.
The VectorIndexSelectionCastImageFilter class requires us to specify which of the vector components is to be extracted from the vector image. This is done with the SetIndex() method. In this example we obtain this value from the command line arguments.
The itk::RescaleIntensityImageFilter filter is instantiated here.
The minimum and maximum values for the output image are specified in the following. Note the use of the itk::NumericTraits class which allows us to define a number of type-related constants in a generic way. The use of traits is a fundamental characteristic of generic programming [5, 1].
Below, we create the reader and writer using the New() method and assign the result to a itk::SmartPointer.
The name of the file to be read or written is passed to the SetFileName() method.
Below we connect the reader, filter and writer to form the data processing pipeline.
Finally we execute the pipeline by invoking Update() on the writer. The call is placed in a try/catch block in case exceptions are thrown.
It is still quite common to store 3D medical images in sets of files each one containing a single slice of a volume dataset. Those 2D files can be read as individual 2D images, or can be grouped together in order to reconstruct a 3D dataset. The same practice can be extended to higher dimensions, for example, for managing 4D datasets by using sets of files each one containing a 3D image. This practice is common in the domain of cardiac imaging, perfusion, functional MRI and PET. This section illustrates the functionalities available in ITK for dealing with reading and writing series of images.
The source code for this section can be found in the file
ImageSeriesReadWrite.cxx.
This example illustrates how to read a series of 2D slices from independent files in order to compose a volume. The class itk::ImageSeriesReader is used for this purpose. This class works in combination with a generator of filenames that will provide a list of files to be read. In this particular example we use the itk::NumericSeriesFileNames class as a filename generator. This generator uses a printf style of string format with a “%d” field that will be successively replaced by a number specified by the user. Here we will use a format like “file%03d.png” for reading PNG files named file001.png, file002.png, file003.png... and so on.
This requires the following headers as shown.
We start by defining the PixelType and ImageType.
The image type is used as a template parameter to instantiate the reader and writer.
Then, we declare the filename generator type and create one instance of it.
The filename generator requires us to provide a pattern of text for the filenames, and numbers for the initial value, last value and increment to be used for generating the names of the files.
The ImageIO object that actually performs the read process is now connected to the ImageSeriesReader. This is the safest way of making sure that we use an ImageIO object that is appropriate for the type of files that we want to read.
The filenames of the input files must be provided to the reader, while the writer is instructed to write the same volume dataset in a single file.
We connect the output of the reader to the input of the writer.
Finally, execution of the pipeline can be triggered by invoking the Update() method in the writer. This call must be placed in a try/catch block since exceptions be potentially be thrown in the process of reading or writing the images.
The source code for this section can be found in the file
ImageReadImageSeriesWrite.cxx.
This example illustrates how to save an image using the itk::ImageSeriesWriter. This class enables the saving of a 3D volume as a set of files containing one 2D slice per file.
The type of the input image is declared here and it is used for declaring the type of the reader. This will be a conventional 3D image reader.
The reader object is constructed using the New() operator and assigning the result to a SmartPointer. The filename of the 3D volume to be read is taken from the command line arguments and passed to the reader using the SetFileName() method.
The type of the series writer must be instantiated taking into account that the input file is a 3D volume and the output files are 2D images. Additionally, the output of the reader is connected as input to the writer.
The writer requires a list of filenames to be generated. This list can be produced with the help of the itk::NumericSeriesFileNames class.
The NumericSeriesFileNames class requires an input string in order to have a template for generating the filenames of all the output slices. Here we compose this string using a prefix taken from the command line arguments and adding the extension for PNG files.
The input string is going to be used for generating filenames by setting the values of the first and last slice. This can be done by collecting information from the input image. Note that before attempting to take any image information from the reader, its execution must be triggered with the invocation of the Update() method, and since this invocation can potentially throw exceptions, it must be put inside a try/catch block.
Now that the image has been read we can query its largest possible region and recover information about the number of pixels along every dimension.
With this information we can find the number that will identify the first and last slices of the 3D data set. These numerical values are then passed to the filename generator object that will compose the names of the files where the slices are going to be stored.
The list of filenames is taken from the names generator and it is passed to the series writer.
Finally we trigger the execution of the pipeline with the Update() method on the writer. At this point the slices of the image will be saved in individual files containing a single slice per file. The filenames used for these slices are those produced by the filename generator.
Note that by saving data into isolated slices we are losing information that may be significant for medical applications, such as the interslice spacing in millimeters.
The source code for this section can be found in the file
RGBImageSeriesReadWrite.cxx.
RGB images are commonly used for representing data acquired from cryogenic sections, optical microscopy and endoscopy. This example illustrates how to read RGB color images from a set of files containing individual 2D slices in order to compose a 3D color dataset. Then we will save it into a single 3D file, and finally save it again as a set of 2D slices with other names.
This requires the following headers as shown.
The itk::RGBPixel class is templated over the type used to represent each one of the Red, Green and Blue components. A typical instantiation of the RGB image class might be as follows.
The image type is used as a template parameter to instantiate the series reader and the volumetric writer.
We use a NumericSeriesFileNames class in order to generate the filenames of the slices to be read. Later on in this example we will reuse this object in order to generate the filenames of the slices to be written.
The ImageIO object that actually performs the read process is now connected to the ImageSeriesReader.
The filenames of the input slices are taken from the names generator and passed to the series reader.
The name of the volumetric output image is passed to the image writer, and we connect the output of the series reader to the input of the volumetric writer.
Finally, execution of the pipeline can be triggered by invoking the Update() method in the volumetric writer. This, of course, is done from inside a try/catch block.
We now proceed to save the same volumetric dataset as a set of slices. This is done only to illustrate the process for saving a volume as a series of 2D individual datasets. The type of the series writer must be instantiated taking into account that the input file is a 3D volume and the output files are 2D images. Additionally, the output of the series reader is connected as input to the series writer.
We now reuse the filename generator in order to produce the list of filenames for the output series. In this case we just need to modify the format of the filename generator. Then, we pass the list of output filenames to the series writer.
Finally we trigger the execution of the series writer from inside a try/catch block.
You may have noticed that apart from the declaration of the PixelType there is nothing in this code that is specific to RGB images. All the actions required to support color images are implemented internally in the itk::ImageIO objects.
With the introduction of computed tomography (CT) followed by other digital diagnostic imaging modalities such as MRI in the 1970’s, and the increasing use of computers in clinical applications, the American College of Radiology (ACR)3 and the National Electrical Manufacturers Association (NEMA)4 recognized the need for a standard method for transferring images as well as associated information between devices manufactured from various vendors.
ACR and NEMA formed a joint committee to develop a standard for Digital Imaging and Communications in Medicine (DICOM). This standard was developed in liaison with other Standardization Organizations such as CEN TC251, JIRA including IEEE, HL7 and ANSI USA as reviewers.
DICOM is a comprehensive set of standards for handling, storing and transmitting information in medical imaging. The DICOM standard was developed based on the previous NEMA specification. The standard specifies a file format definition as well as a network communication protocol. DICOM was developed to enable integration of scanners, servers, workstations and network hardware from multiple vendors into an image archiving and communication system.
DICOM files consist of a header and a body of image data. The header contains standardized as well as free-form fields. The set of standardized fields is called the public DICOM dictionary, an instance of this dictionary is available in ITK in the file Insight/Utilities/gdcm/Dict/dicomV3.dic. The list of free-form fields is also called the shadow dictionary.
A single DICOM file can contain multiples frames, allowing storage of volumes or animations. Image data can be compressed using a large variety of standards, including JPEG (both lossy and lossless), LZW (Lempel Ziv Welch), and RLE (Run-length encoding).
The DICOM Standard is an evolving standard and it is maintained in accordance with the Procedures of the DICOM Standards Committee. Proposals for enhancements are forthcoming from the DICOM Committee member organizations based on input from users of the Standard. These proposals are considered for inclusion in future editions of the Standard. A requirement in updating the Standard is to maintain effective compatibility with previous editions.
For a more detailed description of the DICOM standard see [43].
The following sections illustrate how to use the functionalities that ITK provides for reading and writing DICOM files. This is extremely important in the domain of medical imaging since most of the images that are acquired in a clinical setting are stored and transported using the DICOM standard.
DICOM functionalities in ITK are provided by the GDCM library. This open source library was developed by the CREATIS Team 5 at INSA-Lyon [7]. Although originally this library was distributed under a LGPL License6 , the CREATIS Team was lucid enough to understand the limitations of that license and agreed to adopt the more open BSD-like License7 . This change in their licensing made possible to distribute GDCM along with ITK.
GDCM is now maintained by Mathieu Malaterre and the GDCM community. The version distributed with ITK gets updated with major releases of the GDCM library.
The source code for this section can be found in the file
DicomImageReadWrite.cxx.
This example illustrates how to read a single DICOM slice and write it back as another DICOM slice. In the process an intensity rescaling is also applied.
In order to read and write the slice we use the itk::GDCMImageIO class which encapsulates a connection to the underlying GDCM library. In this way we gain access from ITK to the DICOM functionalities offered by GDCM. The GDCMImageIO object is connected as the ImageIO object to be used by the itk::ImageFileWriter.
We should first include the following header files.
Then we declare the pixel type and image dimension, and use them for instantiating the image type to be read.
With the image type we can instantiate the type of the reader, create one, and set the filename of the image to be read.
GDCMImageIO is an ImageIO class for reading and writing DICOM v3 and ACR/NEMA images. The GDCMImageIO object is constructed here and connected to the ImageFileReader.
At this point we can trigger the reading process by invoking the Update() method. Since this reading process may eventually throw an exception, we place the invocation inside a try/catch block.
We now have the image in memory and can get access to it using the GetOutput() method of the reader. In the remainder of this current example, we focus on showing how to save this image again in DICOM format in a new file.
First, we must instantiate an ImageFileWriter type. Then, we construct one, set the filename to be used for writing, and connect the input image to be written. Since in this example we write the image in different ways, and in each case use a different writer, we enumerated the variable names of the writer objects as well as their types.
We need to explicitly set the proper image IO (GDCMImageIO) to the writer filter since the input DICOM dictionary is being passed along the writing process. The dictionary contains all necessary information that a valid DICOM file should contain, like Patient Name, Patient ID, Institution Name, etc.
The writing process is triggered by invoking the Update() method. Since this execution may result in exceptions being thrown we place the Update() call inside a try/catch block.
We will now rescale the image using the RescaleIntensityImageFilter. For this purpose we use a better suited pixel type: unsigned char instead of signed short. The minimum and maximum values of the output image are explicitly defined in the rescaling filter.
using WritePixelType = unsigned char;
using WriteImageType = itk::Image< WritePixelType, 2 >;
using RescaleFilterType = itk::RescaleIntensityImageFilter<
InputImageType, WriteImageType >;
RescaleFilterType::Pointer rescaler = RescaleFilterType::New();
rescaler->SetOutputMinimum( 0 );
rescaler->SetOutputMaximum( 255 );
We create a second writer object that will save the rescaled image into a new file, which is not in DICOM format. This is done only for the sake of verifying the image against the one that will be saved in DICOM format later in this example.
The writer can be executed by invoking the Update() method from inside a try/catch block.
We proceed now to save the same rescaled image into a file in DICOM format. For this purpose we just need to set up a itk::ImageFileWriter and pass to it the rescaled image as input.
We now need to explicitly set the proper image IO (GDCMImageIO), but also we must tell the ImageFileWriter to not use the MetaDataDictionary from the input but from the GDCMImageIO since this is the one that contains the DICOM specific information
The GDCMImageIO object will automatically detect the pixel type, in this case unsigned char and it will update the DICOM header information accordingly.
Finally we trigger the execution of the DICOM writer by invoking the Update() method from inside a try/catch block.
The source code for this section can be found in the file
DicomSeriesReadImageWrite2.cxx.
Probably the most common representation of datasets in clinical applications is the one that uses sets of DICOM slices in order to compose 3-dimensional images. This is the case for CT, MRI and PET scanners. It is very common therefore for image analysts to have to process volumetric images stored in a set of DICOM files belonging to a common DICOM series.
The following example illustrates how to use ITK functionalities in order to read a DICOM series into a volume and then save this volume in another file format.
The example begins by including the appropriate headers. In particular we will need the itk::GDCMImageIO object in order to have access to the capabilities of the GDCM library for reading DICOM files, and the itk::GDCMSeriesFileNames object for generating the lists of filenames identifying the slices of a common volumetric dataset.
We define the pixel type and dimension of the image to be read. In this particular case, the dimensionality of the image is 3, and we assume a signed short pixel type that is commonly used for X-Rays CT scanners.
The image orientation information contained in the direction cosines of the DICOM header are read in and passed correctly down the image processing pipeline.
We use the image type for instantiating the type of the series reader and for constructing one object of its type.
A GDCMImageIO object is created and connected to the reader. This object is the one that is aware of the internal intricacies of the DICOM format.
Now we face one of the main challenges of the process of reading a DICOM series: to identify from a given directory the set of filenames that belong together to the same volumetric image. Fortunately for us, GDCM offers functionalities for solving this problem and we just need to invoke those functionalities through an ITK class that encapsulates a communication with GDCM classes. This ITK object is the GDCMSeriesFileNames. Conveniently, we only need to pass to this class the name of the directory where the DICOM slices are stored. This is done with the SetDirectory() method. The GDCMSeriesFileNames object will explore the directory and will generate a sequence of filenames for DICOM files for one study/series. In this example, we also call the SetUseSeriesDetails(true) function that tells the GDCMSeriesFileNames object to use additional DICOM information to distinguish unique volumes within the directory. This is useful, for example, if a DICOM device assigns the same SeriesID to a scout scan and its 3D volume; by using additional DICOM information the scout scan will not be included as part of the 3D volume. Note that SetUseSeriesDetails(true) must be called prior to calling SetDirectory(). By default SetUseSeriesDetails(true) will use the following DICOM tags to sub-refine a set of files into multiple series:
If this is not enough for your specific case you can always add some more restrictions using the AddSeriesRestriction() method. In this example we will use the DICOM Tag: 0008 0021 DA 1 Series Date, to sub-refine each series. The format for passing the argument is a string containing first the group then the element of the DICOM tag, separated by a pipe (|) sign.
The GDCMSeriesFileNames object first identifies the list of DICOM series present in the given directory. We receive that list in a reference to a container of strings and then we can do things like print out all the series identifiers that the generator had found. Since the process of finding the series identifiers can potentially throw exceptions, it is wise to put this code inside a try/catch block.
Given that it is common to find multiple DICOM series in the same directory, we must tell the GDCM classes what specific series we want to read. In this example we do this by checking first if the user has provided a series identifier in the command line arguments. If no series identifier has been passed, then we simply use the first series found during the exploration of the directory.
We pass the series identifier to the name generator and ask for all the filenames associated to that series. This list is returned in a container of strings by the GetFileNames() method.
The list of filenames can now be passed to the itk::ImageSeriesReader using the SetFileNames() method.
Finally we can trigger the reading process by invoking the Update() method in the reader. This call as usual is placed inside a try/catch block.
At this point, we have a volumetric image in memory that we can access by invoking the GetOutput() method of the reader.
We proceed now to save the volumetric image in another file, as specified by the user in the command line arguments of this program. Thanks to the ImageIO factory mechanism, only the filename extension is needed to identify the file format in this case.
The process of writing the image is initiated by invoking the Update() method of the writer.
Note that in addition to writing the volumetric image to a file we could have used it as the input for any 3D processing pipeline. Keep in mind that DICOM is simply a file format and a network protocol. Once the image data has been loaded into memory, it behaves as any other volumetric dataset that you could have loaded from any other file format.
The source code for this section can be found in the file
DicomSeriesReadSeriesWrite.cxx.
This example illustrates how to read a DICOM series into a volume and then save this volume into another DICOM series using the exact same header information. It makes use of the GDCM library.
The main purpose of this example is to show how to properly propagate the DICOM specific information along the pipeline to be able to correctly write back the image using the information from the input DICOM files.
Please note that writing DICOM files is quite a delicate operation since we are dealing with a significant amount of patient specific data. It is your responsibility to verify that the DICOM headers generated from this code are not introducing risks in the diagnosis or treatment of patients. It is as well your responsibility to make sure that the privacy of the patient is respected when you process data sets that contain personal information. Privacy issues are regulated in the United States by the HIPAA norms8 . You would probably find similar legislation in every country.
When saving datasets in DICOM format it must be made clear whether these datasets have been processed in any way, and if so, you should inform the recipients of the data about the purpose and potential consequences of the processing. This is fundamental if the datasets are intended to be used for diagnosis, treatment or follow-up of patients. For example, the simple reduction of a dataset from a 16-bits/pixel to a 8-bits/pixel representation may make it impossible to detect certain pathologies and as a result will expose the patient to the risk of remaining untreated for a long period of time while her/his pathology progresses.
You are strongly encouraged to get familiar with the report on medical errors “To Err is Human”, produced by the U.S. Institute of Medicine [31]. Raising awareness about the high frequency of medical errors is a first step in reducing their occurrence.
After all these warnings, let us now go back to the code and get familiar with the use of ITK and GDCM for writing DICOM Series. The first step that we must take is to include the header files of the relevant classes. We include the GDCMImageIO class, the GDCM filenames generator, as well as the series reader and writer.
As a second step, we define the image type to be used in this example. This is done by explicitly selecting a pixel type and a dimension. Using the image type we can define the type of the series reader.
We also declare types for the itk::GDCMImageIO object that will actually read and write the DICOM images, and the itk::GDCMSeriesFileNames object that will generate and order all the filenames for the slices composing the volume dataset. Once we have the types, we proceed to create instances of both objects.
Just as the previous example, we get the DICOM filenames from the directory. Note however, that in this case we use the SetInputDirectory() method instead of the SetDirectory(). This is done because in the present case we will use the filenames generator for producing both the filenames for reading and the filenames for writing. Then, we invoke the GetInputFileNames() method in order to get the list of filenames to read.
We construct one instance of the series reader object. Set the DICOM image IO object to be used with it, and set the list of filenames to read.
We can trigger the reading process by calling the Update() method on the series reader. It is wise to put this invocation inside a try/catch block since the process may eventually throw exceptions.
At this point we have the volumetric data loaded in memory and we can access it by invoking the GetOutput() method in the reader.
Now we can prepare the process for writing the dataset. First, we take the name of the output directory from the command line arguments.
Second, we make sure the output directory exists, using the cross-platform tools: itksys::SystemTools. In this case we choose to create the directory if it does not exist yet.
We explicitly instantiate the image type to be used for writing, and use the image type for instantiating the type of the series writer.
We construct a series writer and connect to its input the output from the reader. Then we pass the GDCM image IO object in order to be able to write the images in DICOM format.
It is time now to setup the GDCMSeriesFileNames to generate new filenames using another output directory. Then simply pass those newly generated files to the series writer.
The following line of code is extremely important for this process to work correctly. The line is taking the MetaDataDictionary from the input reader and passing it to the output writer. This step is important because the MetaDataDictionary contains all the entries of the input DICOM header.
Finally we trigger the writing process by invoking the Update() method in the series writer. We place this call inside a try/catch block, in case any exception is thrown during the writing process.
Please keep in mind that you should avoid generating DICOM files which have the appearance of being produced by a scanner. It should be clear from the directory or filenames that these data were the result of the execution of some sort of algorithm. This will prevent your dataset from being used as scanner data by accident.
The source code for this section can be found in the file
DicomImageReadPrintTags.cxx.
It is often valuable to be able to query the entries from the header of a DICOM file. This can be used for consistency checking, or simply for verifying that we have the correct dataset in our hands. This example illustrates how to read a DICOM file and then print out most of the DICOM header information. The binary fields of the DICOM header are skipped.
The headers of the main classes involved in this example are specified below. They include the image file reader, the GDCMImageIO object, the MetaDataDictionary and its entry element, the MetaDataObject.
We instantiate the type to be used for storing the image once it is read into memory.
Using the image type as a template parameter we instantiate the type of the image file reader and construct one instance of it.
The GDCM image IO type is declared and used for constructing one image IO object.
We pass to the reader the filename of the image to be read and connect the ImageIO object to it too.
The reading process is triggered with a call to the Update() method. This call should be placed inside a try/catch block because its execution may result in exceptions being thrown.
Now that the image has been read, we obtain the MetaDataDictionary from the ImageIO object using the GetMetaDataDictionary() method.
Since we are interested only in the DICOM tags that can be expressed in strings, we declare a MetaDataObject suitable for managing strings.
We instantiate the iterators that will make possible to walk through all the entries of the MetaDataDictionary.
For each one of the entries in the dictionary, we check first if its element can be converted to a string, a dynamic_cast is used for this purpose.
For those entries that can be converted, we take their DICOM tag and pass it to the GetLabelFromTag() method of the GDCMImageIO class. This method checks the DICOM dictionary and returns the string label associated with the tag that we are providing in the tagkey variable. If the label is found, it is returned in labelId variable. The method itself returns false if the tagkey is not found in the dictionary. For example ”0010|0010” in tagkey becomes ”Patient’s Name” in labelId.
The actual value of the dictionary entry is obtained as a string with the GetMetaDataObjectValue() method.
At this point we can print out an entry by concatenating the DICOM Name or label, the numeric tag and its actual value.
Finally we just close the loop that will walk through all the Dictionary entries.
It is also possible to read a specific tag. In that case the string of the entry can be used for querying the MetaDataDictionary.
If the entry is actually found in the Dictionary, then we can attempt to convert it to a string entry by using a dynamic_cast.
If the dynamic cast succeeds, then we can print out the values of the label, the tag and the actual value.
Another way to read a specific tag is to use the encapsulation above MetaDataDictionary. Note that this is stricly equivalent to the above code.
std::string tagkey = "0008|1050";
std::string labelId;
if( itk::GDCMImageIO::GetLabelFromTag( tagkey, labelId ) )
{
std::string value;
std::cout << labelId << " (" << tagkey << "): ";
if( dicomIO->GetValueFromTag(tagkey, value) )
{
std::cout << value;
}
else
{
std::cout << "(No Value Found in File)";
}
std::cout << std::endl;
}
else
{
std::cerr << "Trying to access inexistant DICOM tag." << std::endl;
}
For a full description of the DICOM dictionary please look at the file.
Insight/Utilities/gdcm/Dicts/dicomV3.dic
The following piece of code will print out the proper pixel type / component for instantiating an itk::ImageFileReader that can properly import the printed DICOM file.
itk::ImageIOBase::IOPixelType pixelType
= reader->GetImageIO()->GetPixelType();
itk::ImageIOBase::IOComponentType componentType
= reader->GetImageIO()->GetComponentType();
std::cout << "PixelType: " << reader->GetImageIO()
->GetPixelTypeAsString(pixelType) << std::endl;
std::cout << "Component Type: " << reader->GetImageIO()
->GetComponentTypeAsString(componentType) << std::endl;
The source code for this section can be found in the file
DicomSeriesReadPrintTags.cxx.
This example illustrates how to read a DICOM series into a volume and then print most of the DICOM header information. The binary fields are skipped.
The header files for the series reader and the GDCM classes for image IO and name generation should be included first.
Next, we instantiate the type to be used for storing the image once it is read into memory.
We use the image type for instantiating the series reader type and then we construct one object of this class.
A GDCMImageIO object is created and assigned to the reader.
A GDCMSeriesFileNames is declared in order to generate the names of DICOM slices. We specify the directory with the SetInputDirectory() method and, in this case, take the directory name from the command line arguments. You could have obtained the directory name from a file dialog in a GUI.
The list of files to read is obtained from the name generator by invoking the GetInputFileNames() method and receiving the results in a container of strings. The list of filenames is passed to the reader using the SetFileNames() method.
We trigger the reader by invoking the Update() method. This invocation should normally be done inside a try/catch block given that it may eventually throw exceptions.
ITK internally queries GDCM and obtains all the DICOM tags from the file headers. The tag values are stored in the itk::MetaDataDictionary which is a general-purpose container for {key,value} pairs. The Metadata dictionary can be recovered from any ImageIO class by invoking the GetMetaDataDictionary() method.
In this example, we are only interested in the DICOM tags that can be represented as strings. Therefore, we declare a itk::MetaDataObject of string type in order to receive those particular values.
The metadata dictionary is organized as a container with its corresponding iterators. We can therefore visit all its entries by first getting access to its Begin() and End() methods.
We are now ready for walking through the list of DICOM tags. For this purpose we use the iterators that we just declared. At every entry we attempt to convert it into a string entry by using the dynamic_cast based on RTTI information9 . The dictionary is organized like a std::map structure, so we should use the first and second members of every entry in order to get access to the {key,value} pairs.
while( itr != end )
{
itk::MetaDataObjectBase::Pointer entry = itr->second;
MetaDataStringType::Pointer entryvalue =
dynamic_cast<MetaDataStringType ⋆>( entry.GetPointer() );
if( entryvalue )
{
std::string tagkey = itr->first;
std::string tagvalue = entryvalue->GetMetaDataObjectValue();
std::cout << tagkey << " = " << tagvalue << std::endl;
}
++itr;
}
It is also possible to query for specific entries instead of reading all of them as we did above. In this case, the user must provide the tag identifier using the standard DICOM encoding. The identifier is stored in a string and used as key in the dictionary.
Since the entry may or may not be of string type we must again use a dynamic_cast in order to attempt to convert it to a string dictionary entry. If the conversion is successful, we can then print out its content.
MetaDataStringType::ConstPointer entryvalue =
dynamic_cast<const MetaDataStringType ⋆>( tagItr->second.GetPointer() );
if( entryvalue )
{
std::string tagvalue = entryvalue->GetMetaDataObjectValue();
std::cout << "Patient's Name (" << entryId << ") ";
std::cout << " is: " << tagvalue << std::endl;
}
else
{
std::cerr << "Entry was not of string type" << std::endl;
return EXIT_FAILURE;
}
This type of functionality will probably be more useful when provided through a graphical user interface. For a full description of the DICOM dictionary please look at the following file.
Insight/Utilities/gdcm/Dicts/dicomV3.dic
The source code for this section can be found in the file
DicomImageReadChangeHeaderWrite.cxx.
This example illustrates how to read a single DICOM slice and write it back with some changed header information as another DICOM slice. Header Key/Value pairs can be specified on the command line. The keys are defined in the file
Insight/Utilities/gdcm/Dicts/dicomV3.dic.
Please note that modifying the content of a DICOM header is a very risky operation. The header contains fundamental information about the patient and therefore its consistency must be protected from any data corruption. Before attempting to modify the DICOM headers of your files, you must make sure that you have a very good reason for doing so, and that you can ensure that this information change will not result in a lower quality of health care being delivered to the patient.
We must start by including the relevant header files. Here we include the image reader, image writer, the image, the metadata dictionary and its entries, the metadata objects and the GDCMImageIO. The metadata dictionary is the data container that stores all the entries from the DICOM header once the DICOM image file is read into an ITK image.
We declare the image type by selecting a particular pixel type and image dimension.
We instantiate the reader type by using the image type as template parameter. An instance of the reader is created and the file name to be read is taken from the command line arguments.
The GDCMImageIO object is created in order to provide the services for reading and writing DICOM files. The newly created image IO class is connected to the reader.
The reading of the image is triggered by invoking Update() in the reader.
We take the metadata dictionary from the image that the reader had loaded in memory.
Now we access the entries in the metadata dictionary, and for particular key values we assign a new content to the entry. This is done here by taking {key,value} pairs from the command line arguments. The relevant method is EncapsulateMetaData that takes the dictionary and for a given key provided by entryId, replaces the current value with the content of the value variable. This is repeated for every potential pair present in the command line arguments.
Now that the dictionary has been updated, we proceed to save the image. This output image will have the modified data associated with its DICOM header.
Using the image type, we instantiate a writer type and construct a writer. A short pipeline between the reader and the writer is connected. The filename to write is taken from the command line arguments. The image IO object is connected to the writer.
Execution of the writer is triggered by invoking the Update() method.
Remember again, that modifying the header entries of a DICOM file involves very serious risks for patients and therefore must be done with extreme caution.